making a stylish 24-hour clock face
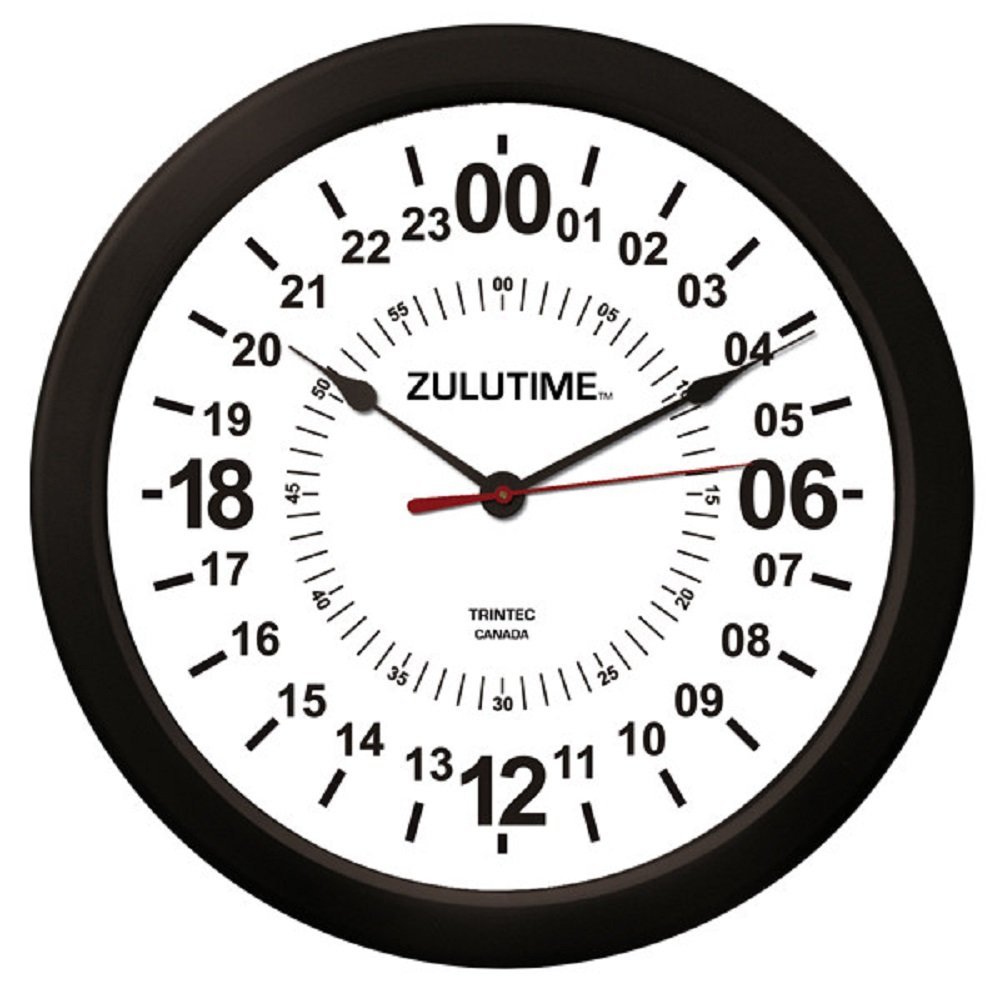
Shopping for a 24-hour wall clock is frustrating if you care at all about style. I grew up on military bases, so I’ve seen a lot of these ones:
But I haven’t found any with pizazz or imagination. That’s why I decided to make my own.
the first prototype
The box of mechanical parts that move the hands is called the movement. 24-hour clock movements are cheap and easy to find online. I bought this one for $10 and made a quick prototype out of cardboard from a pizza box.
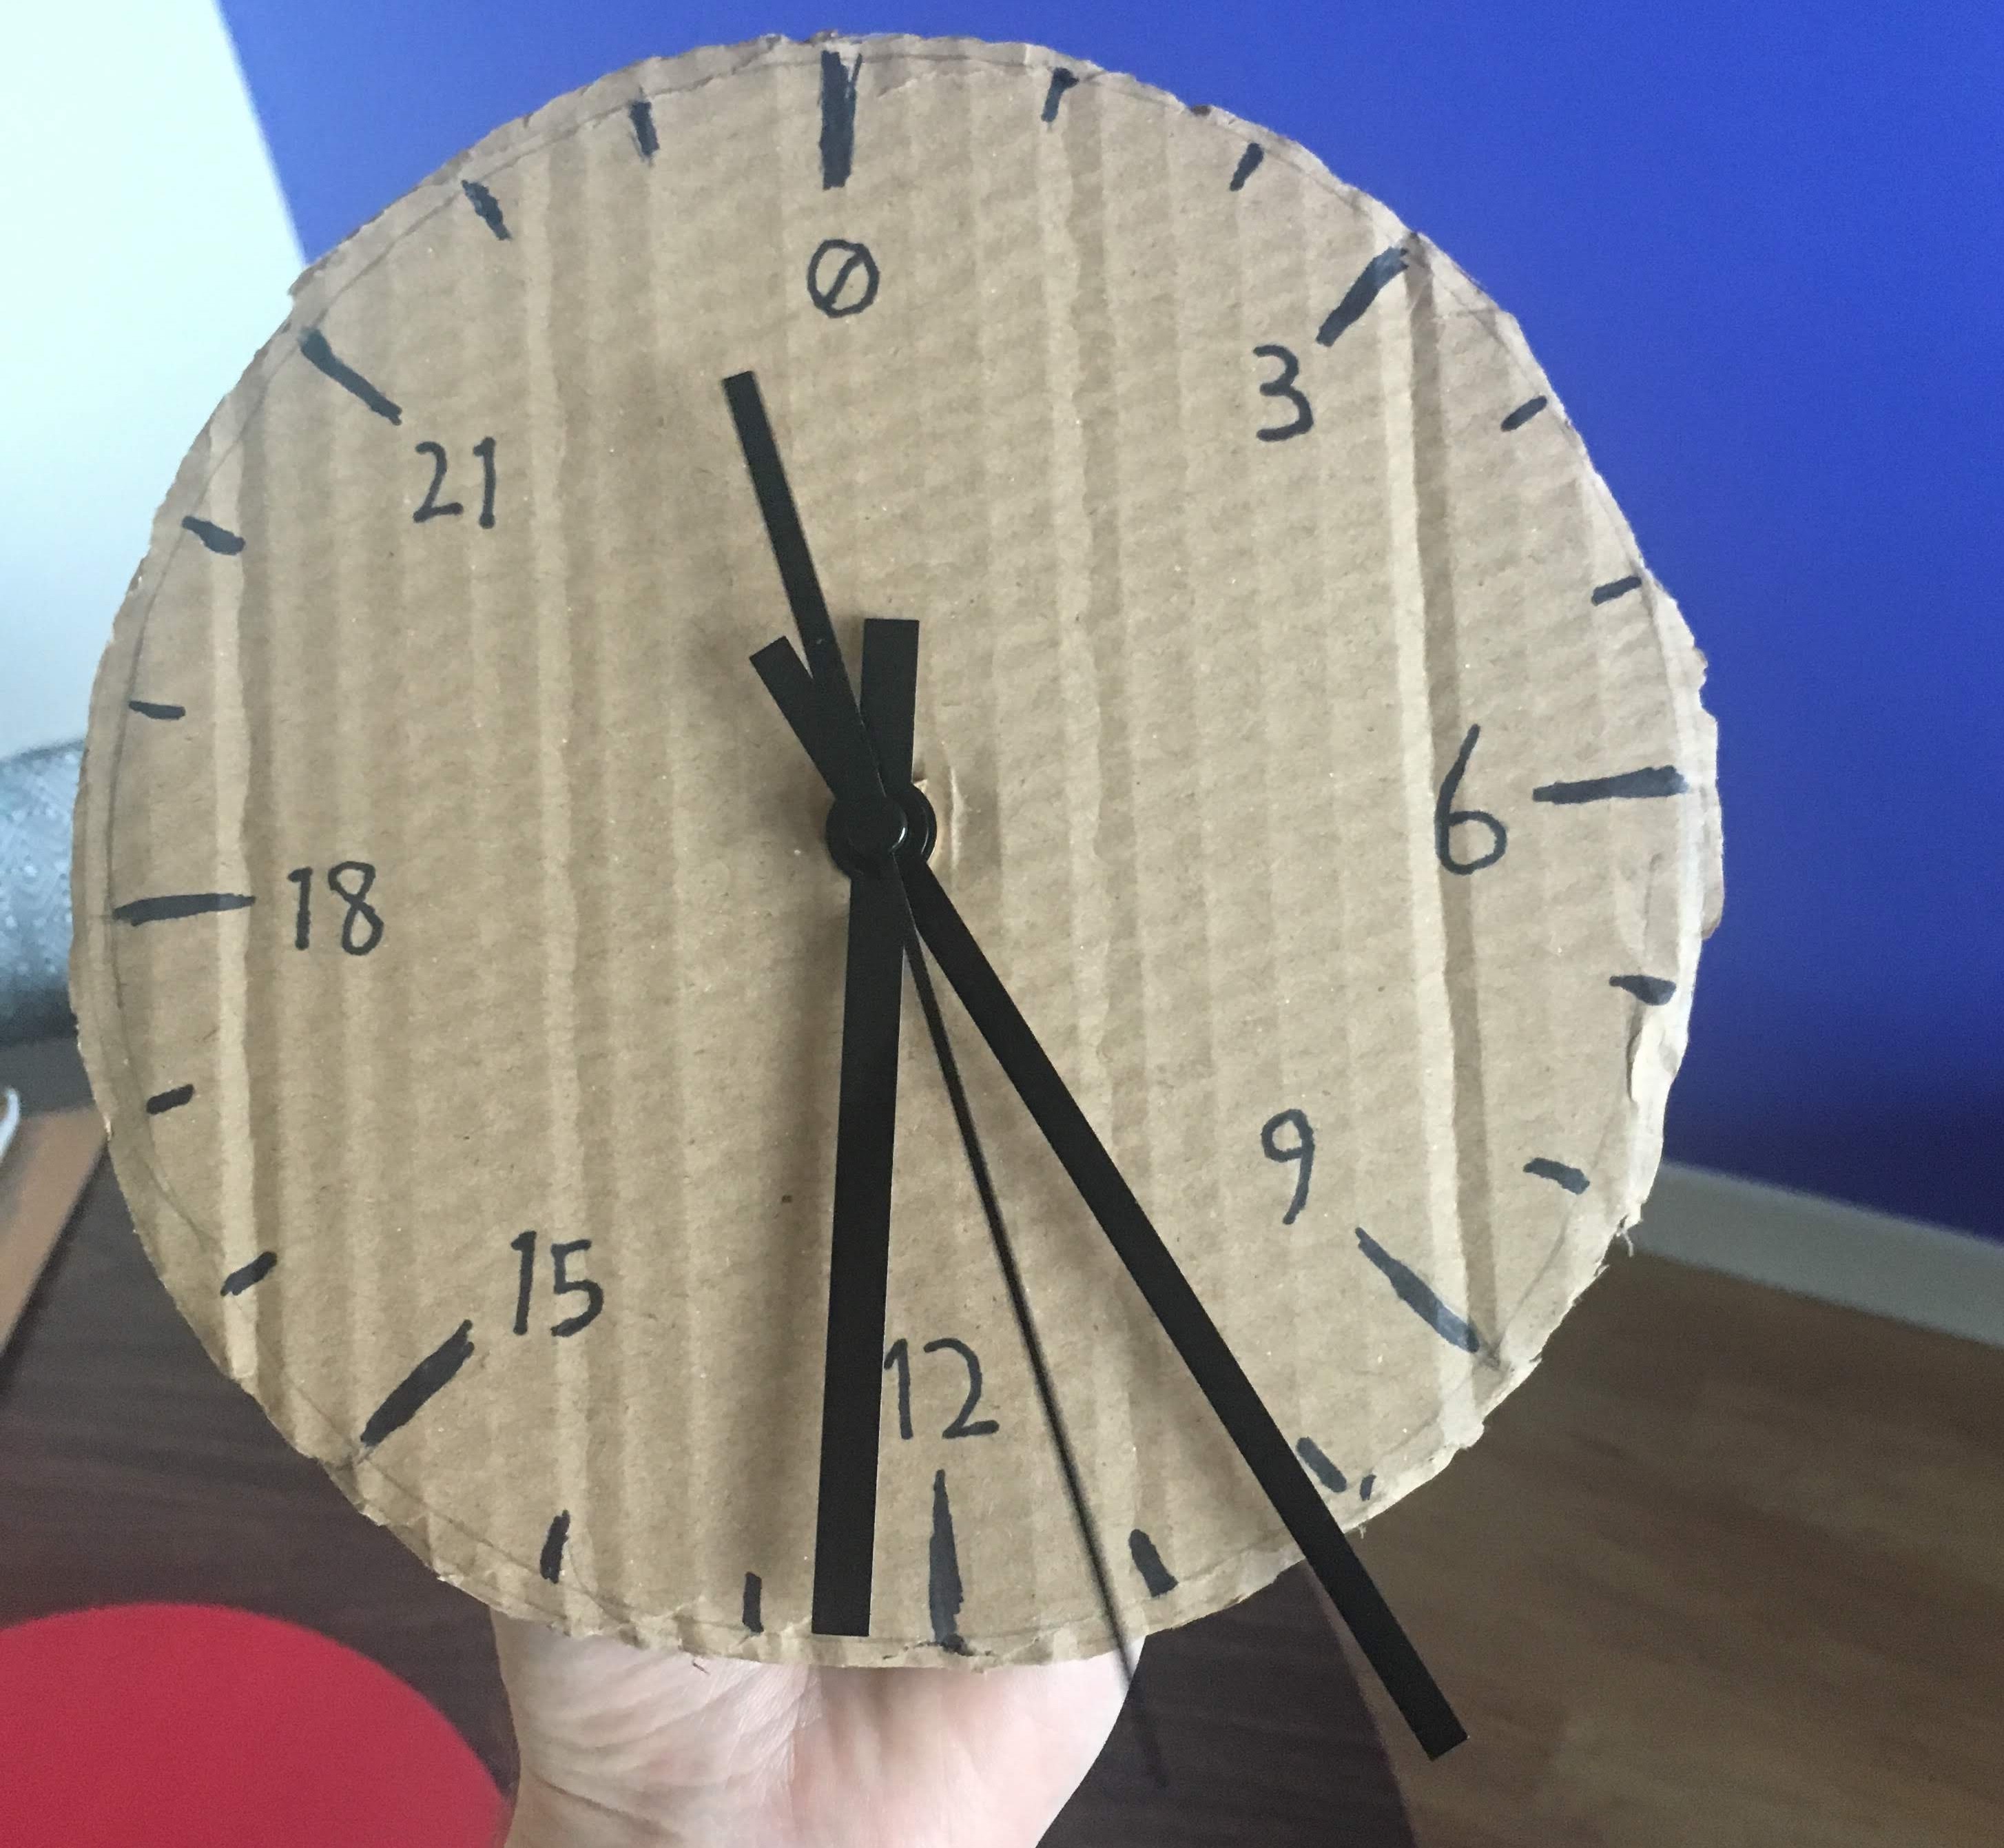
This was even less stylish than the military ones, but it worked. The time was readable. From here I started thinking about how to make the face more graphical, to indicate that it’s meant to be read as a 24-hour clock without numerical labels.
the second prototype
When the hour hand of a clock revolves once per day instead of twice, a nifty thing happens that opens up more face design options: each position on the clock represents a time of day, instead of a number that could represent either of two different times. This means that any sector (like a pie slice) of the circle represents a span of time. I could have used this fact to divide the face into AM and PM halves, but that didn’t seem like the most natural division.

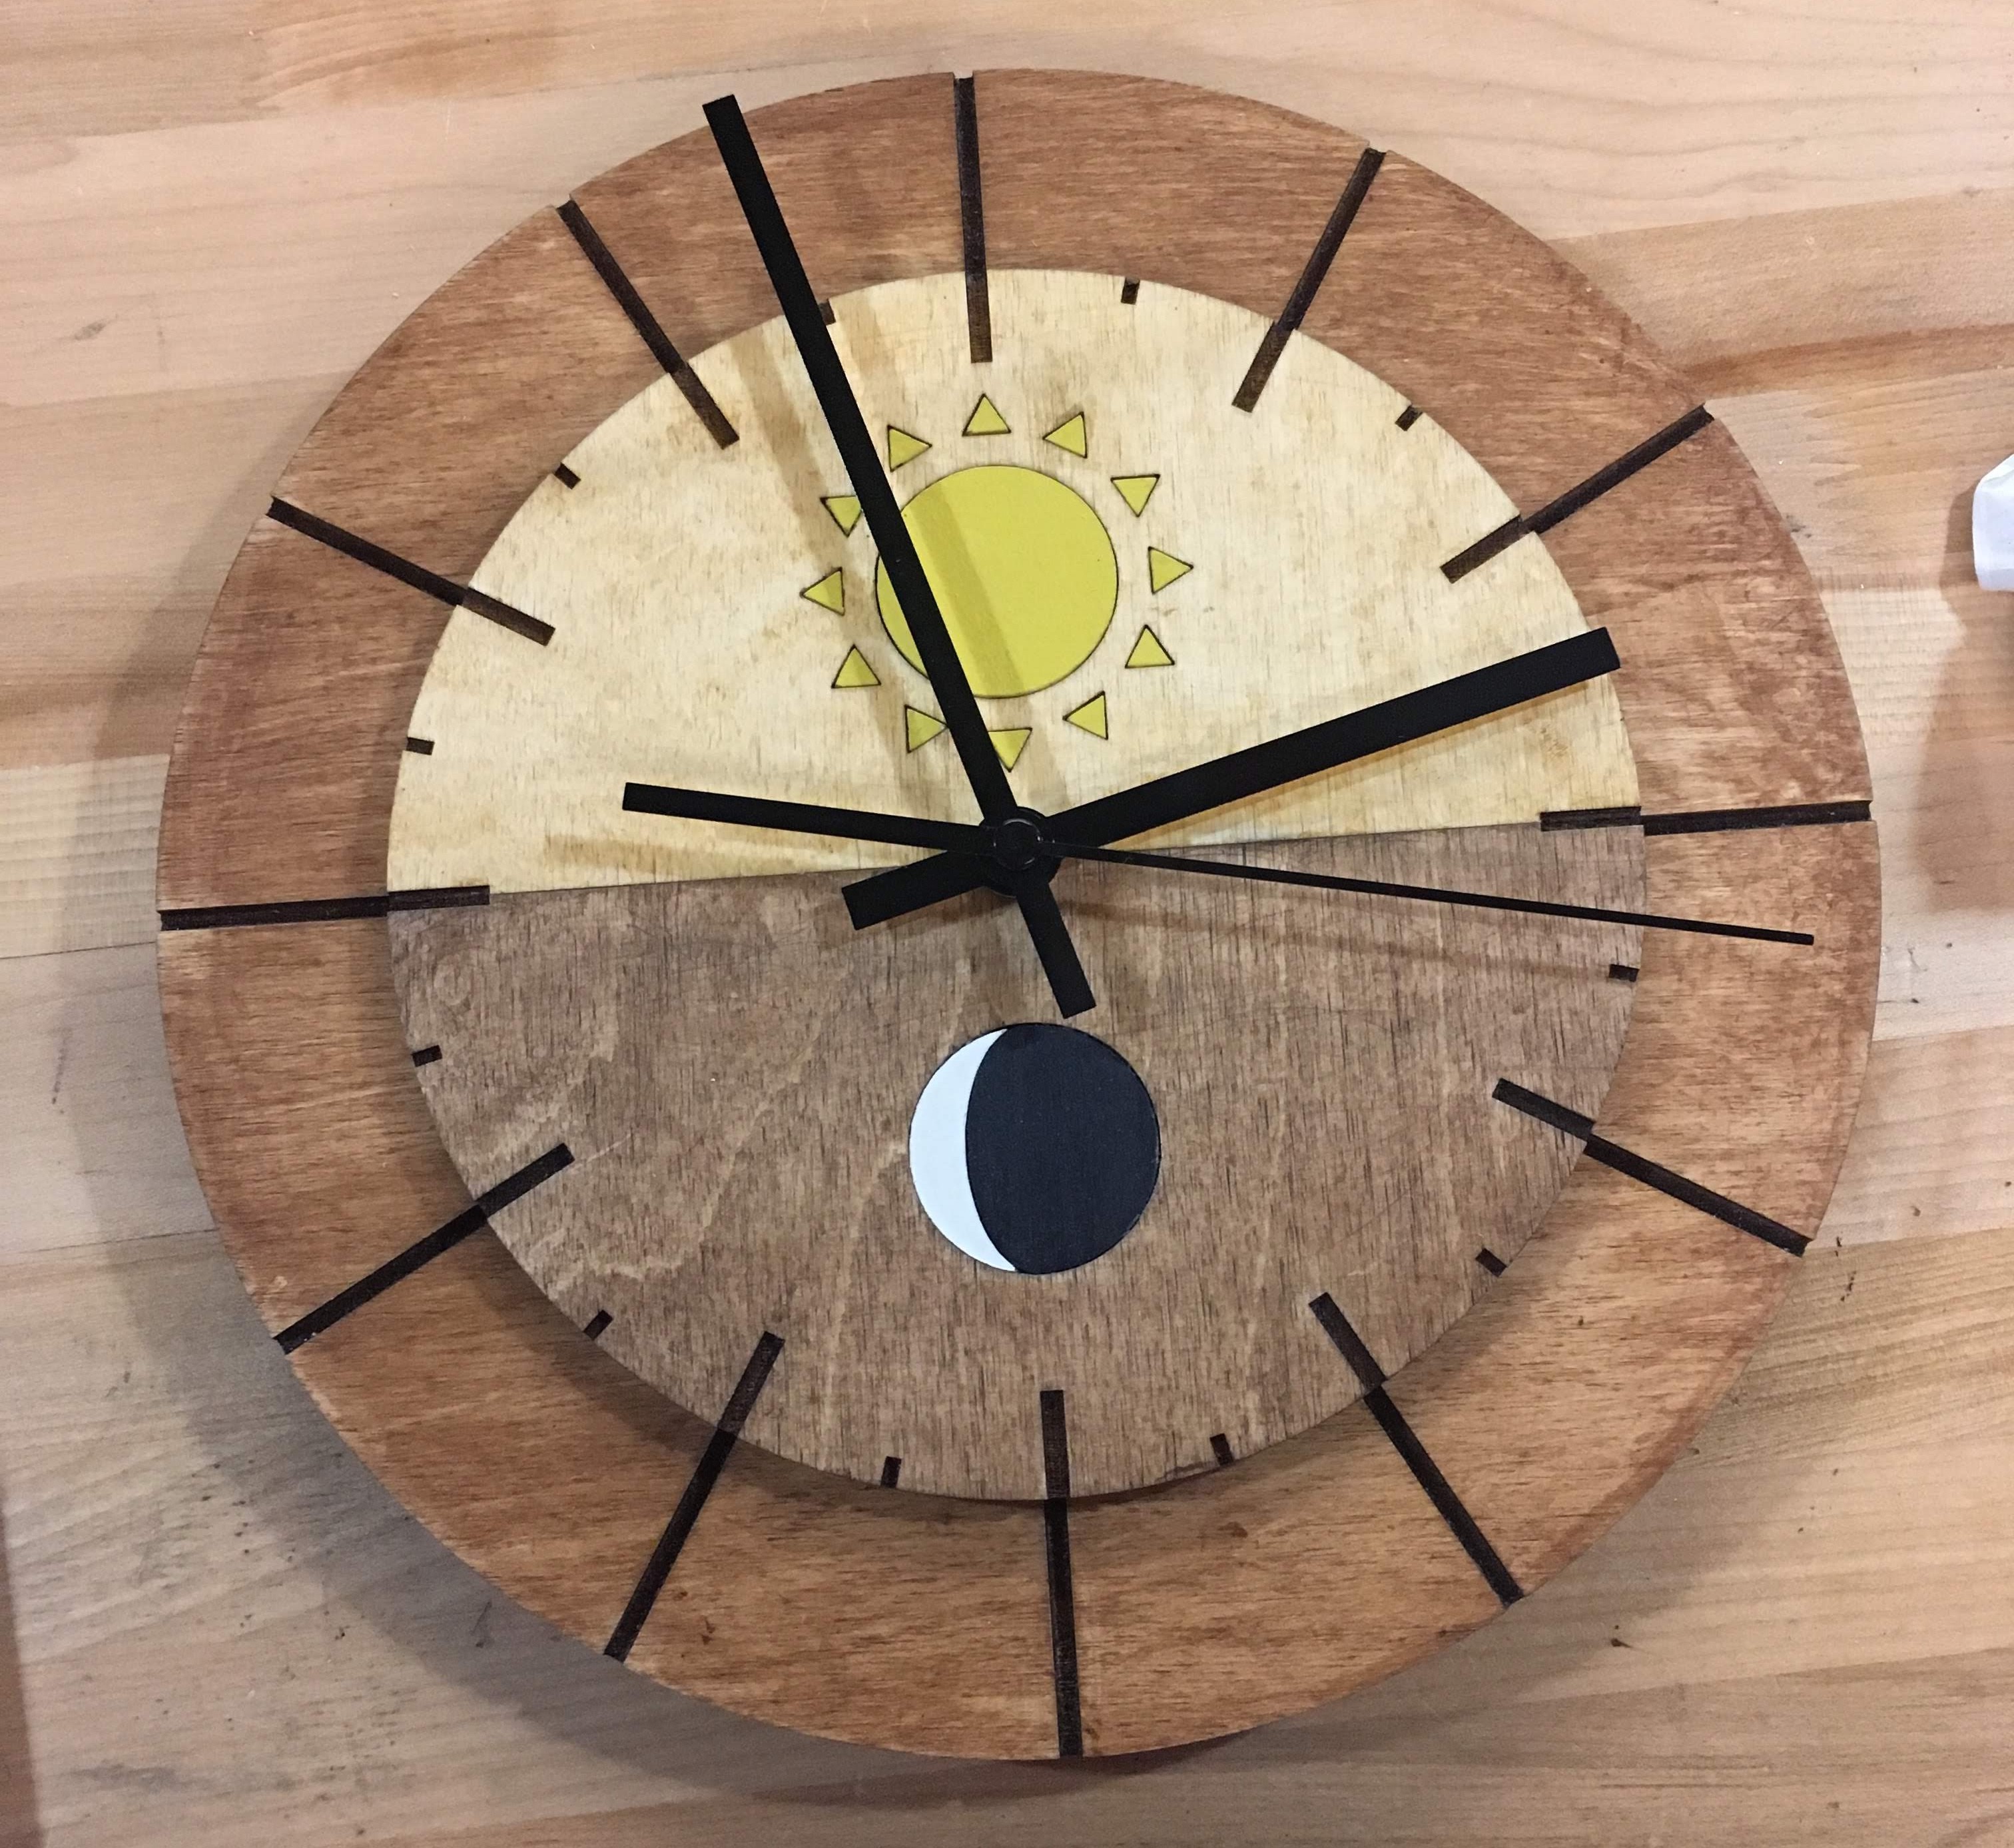
I divided the hours into night and day, with moon and sun graphics to indicate the meaning of each half. I made a large notch for each of the hours that are typically marked on minimalist 12-hour clocks: 3, 6, 9, 12, and their counterparts on the 24-hour scale. This put the large hour notches in places that don’t make sense for the minutes (60 minutes / 8 notches = 7.5 minutes per notch), so I added another ring of notches for the minutes.
This drawing was the basis for my second prototype.
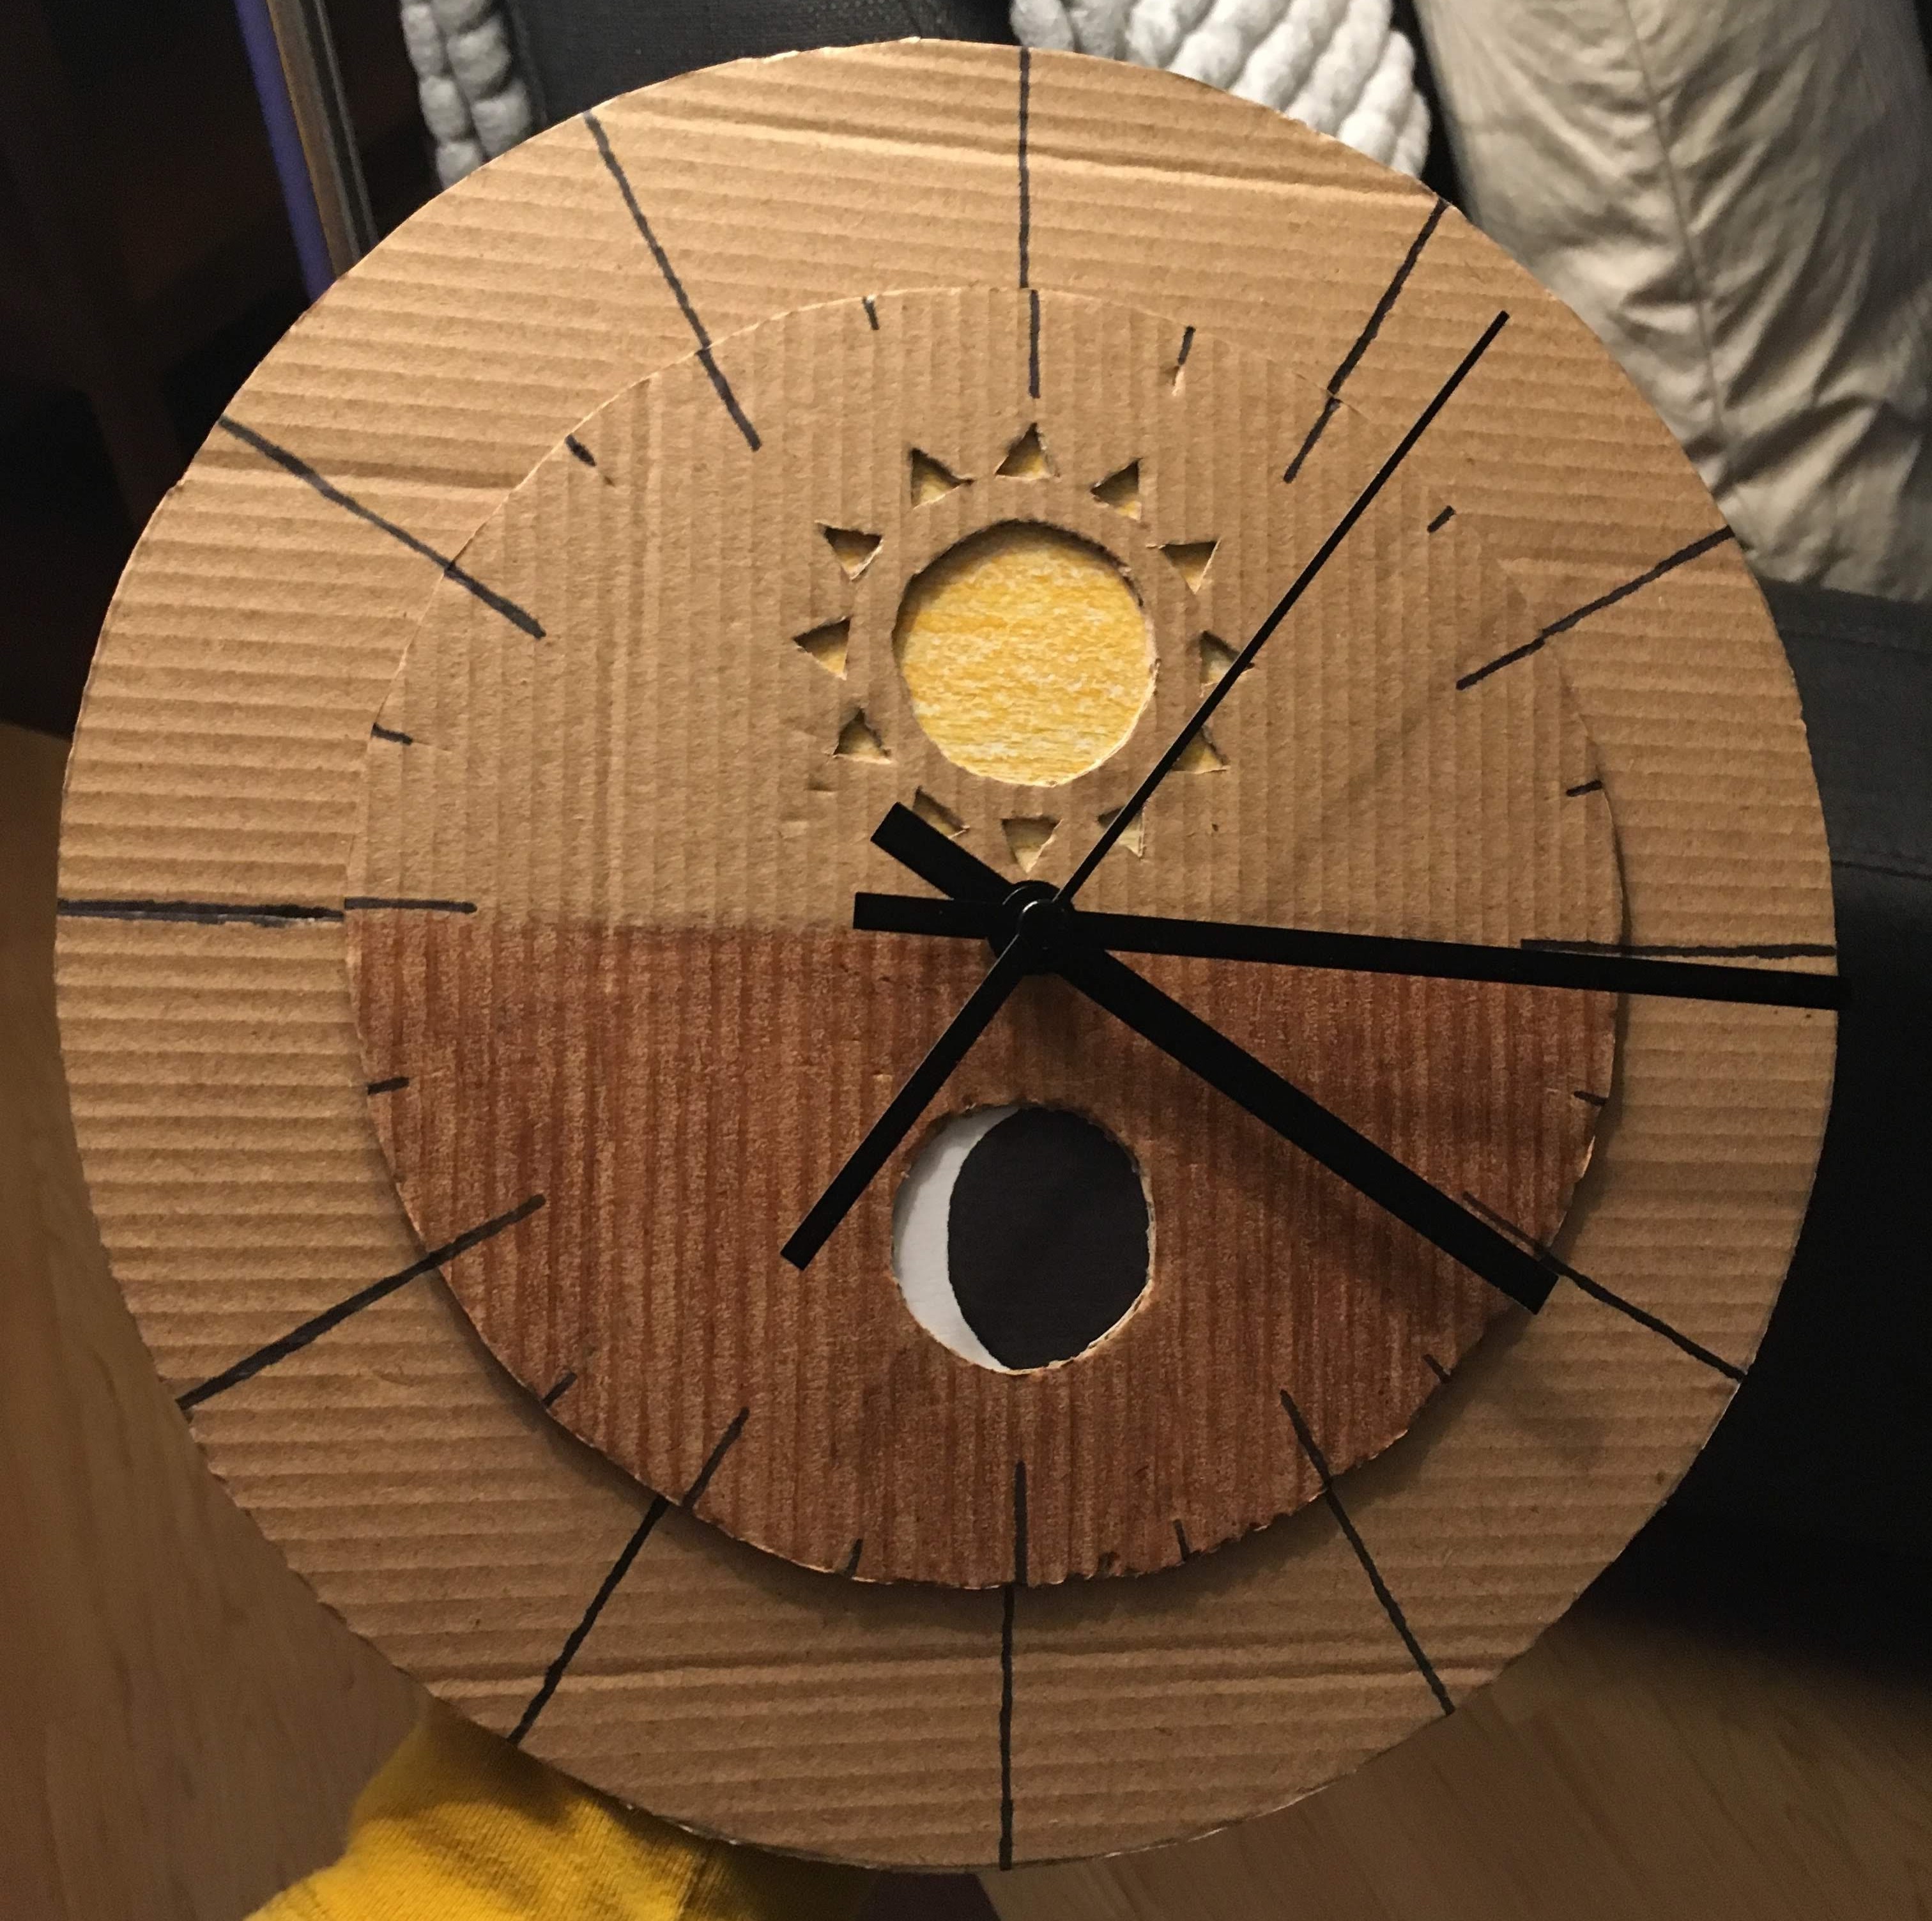
This one was made of finer cardboard (from a bathroom scale box, I think) and a couple of index cards coloured with crayon and marker. I swapped the sun and the moon to make the hour hand mimic the path of the sun across the sky (for a viewer facing south in the northern hemisphere), and I changed the moon to include the dark side for the sake of symmetry.
You’ll notice that I gave up highlighting every third hour. I thought that the notches looked less busy and confusing if I highlighted the even-numbered hours, so that the large hour notches lined up with the minute notches. Even though the problem of different hour and minute scales was fixed, I kept the separate rings for hours and minutes because the day/night division doesn’t apply to the minutes and because I like how it looks.
my first finished clocks
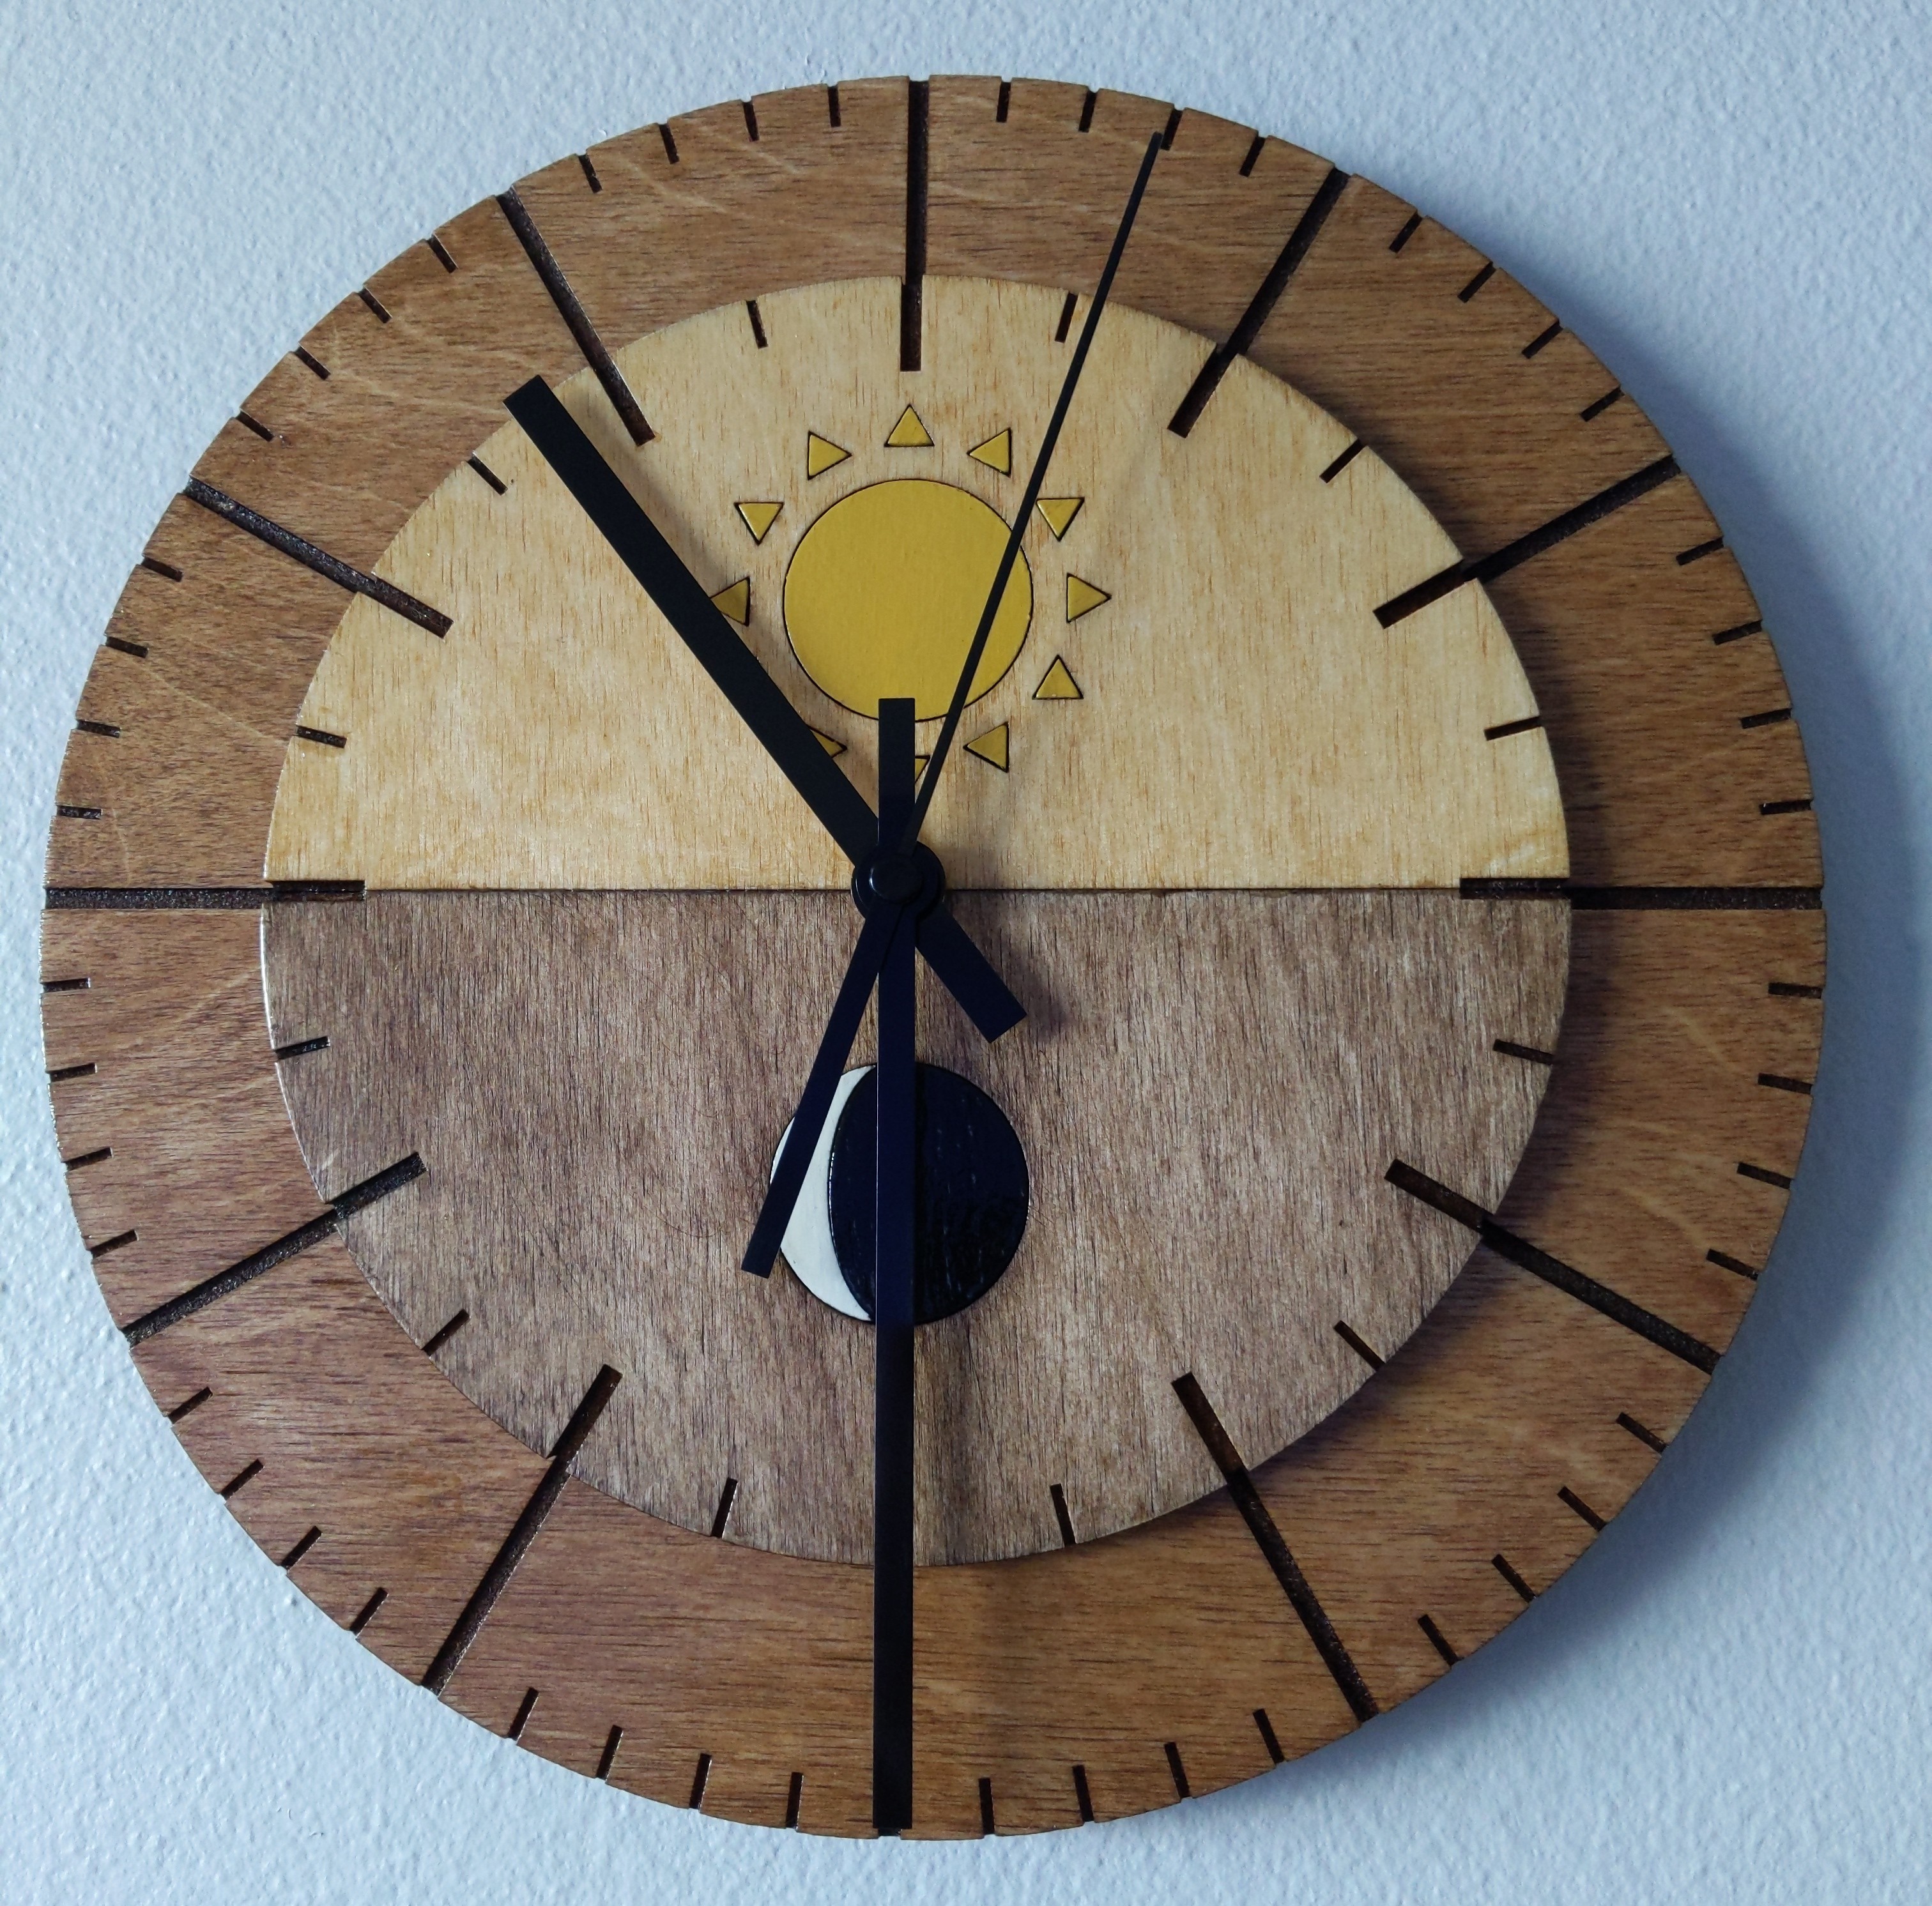
Using a laser cutter, I faithfully recreated my prototype in plywood from an art store. (More on the fabrication process later, when I show you my latest design.)
This bad boy hung on my wall for a few months, until it went home with my mother. I took the opportunity make a new version for myself with refined notches. I think I did a better job of controlling the stain this time around, too.
This one has all of the minute notches and larger odd-numbered hour notches, and the large notches extend down the edge of the hour disc to appear continuous with the large minute notches.
inspirations and ideas
If you’ve ever played The Legend of Zelda: The Wind Waker, you might recognise my design.

See the clock in the bottom-left corner?

In the game, the disc rotated past a semicircular shutter and the moon changed phases. This was the main inspiration for my design.
Like the Wind Waker clock, mine visually alludes to noon, midnight, sunrise, and sunset. Note, however, that the day’s length varies over the course of the year (in Seattle, the day gets as short as 8 hours and as long as 16 hours). Time zones compound the inaccuracy - the astronomical analogy wouldn’t make as much sense in places like Spain or western China, where the edges of large time zones have civil time misaligned with astronomical time by over an hour. And, finally, my favourite: daylight saving time. Twice a year I take this clock down from my wall and adjust it by an hour, even though sunset and sunrise didn’t change by an hour on that day. I digress.
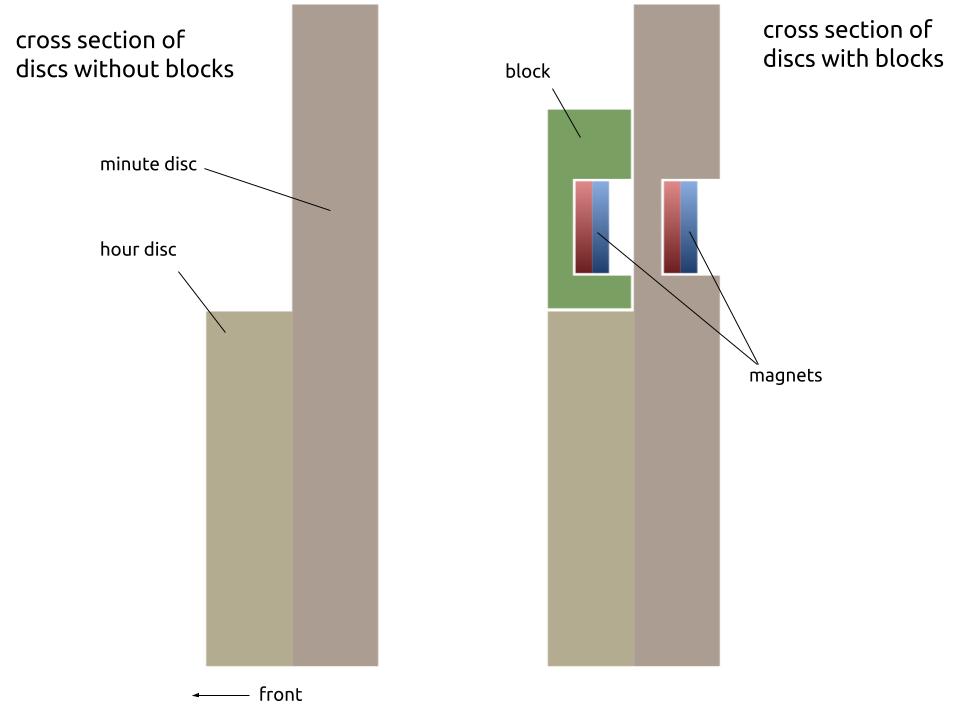
As I said before, an arc or sector of this clock represents a recurring daily time span. I’ve considered modifying this clock with some magnets so that I can clip curved blocks onto the edge of the hour disc to indicate recurring events like sleep or the work day.

a fox clock
Concurrently with the second clock, I made another one for an old friend who had a fascination with foxes.
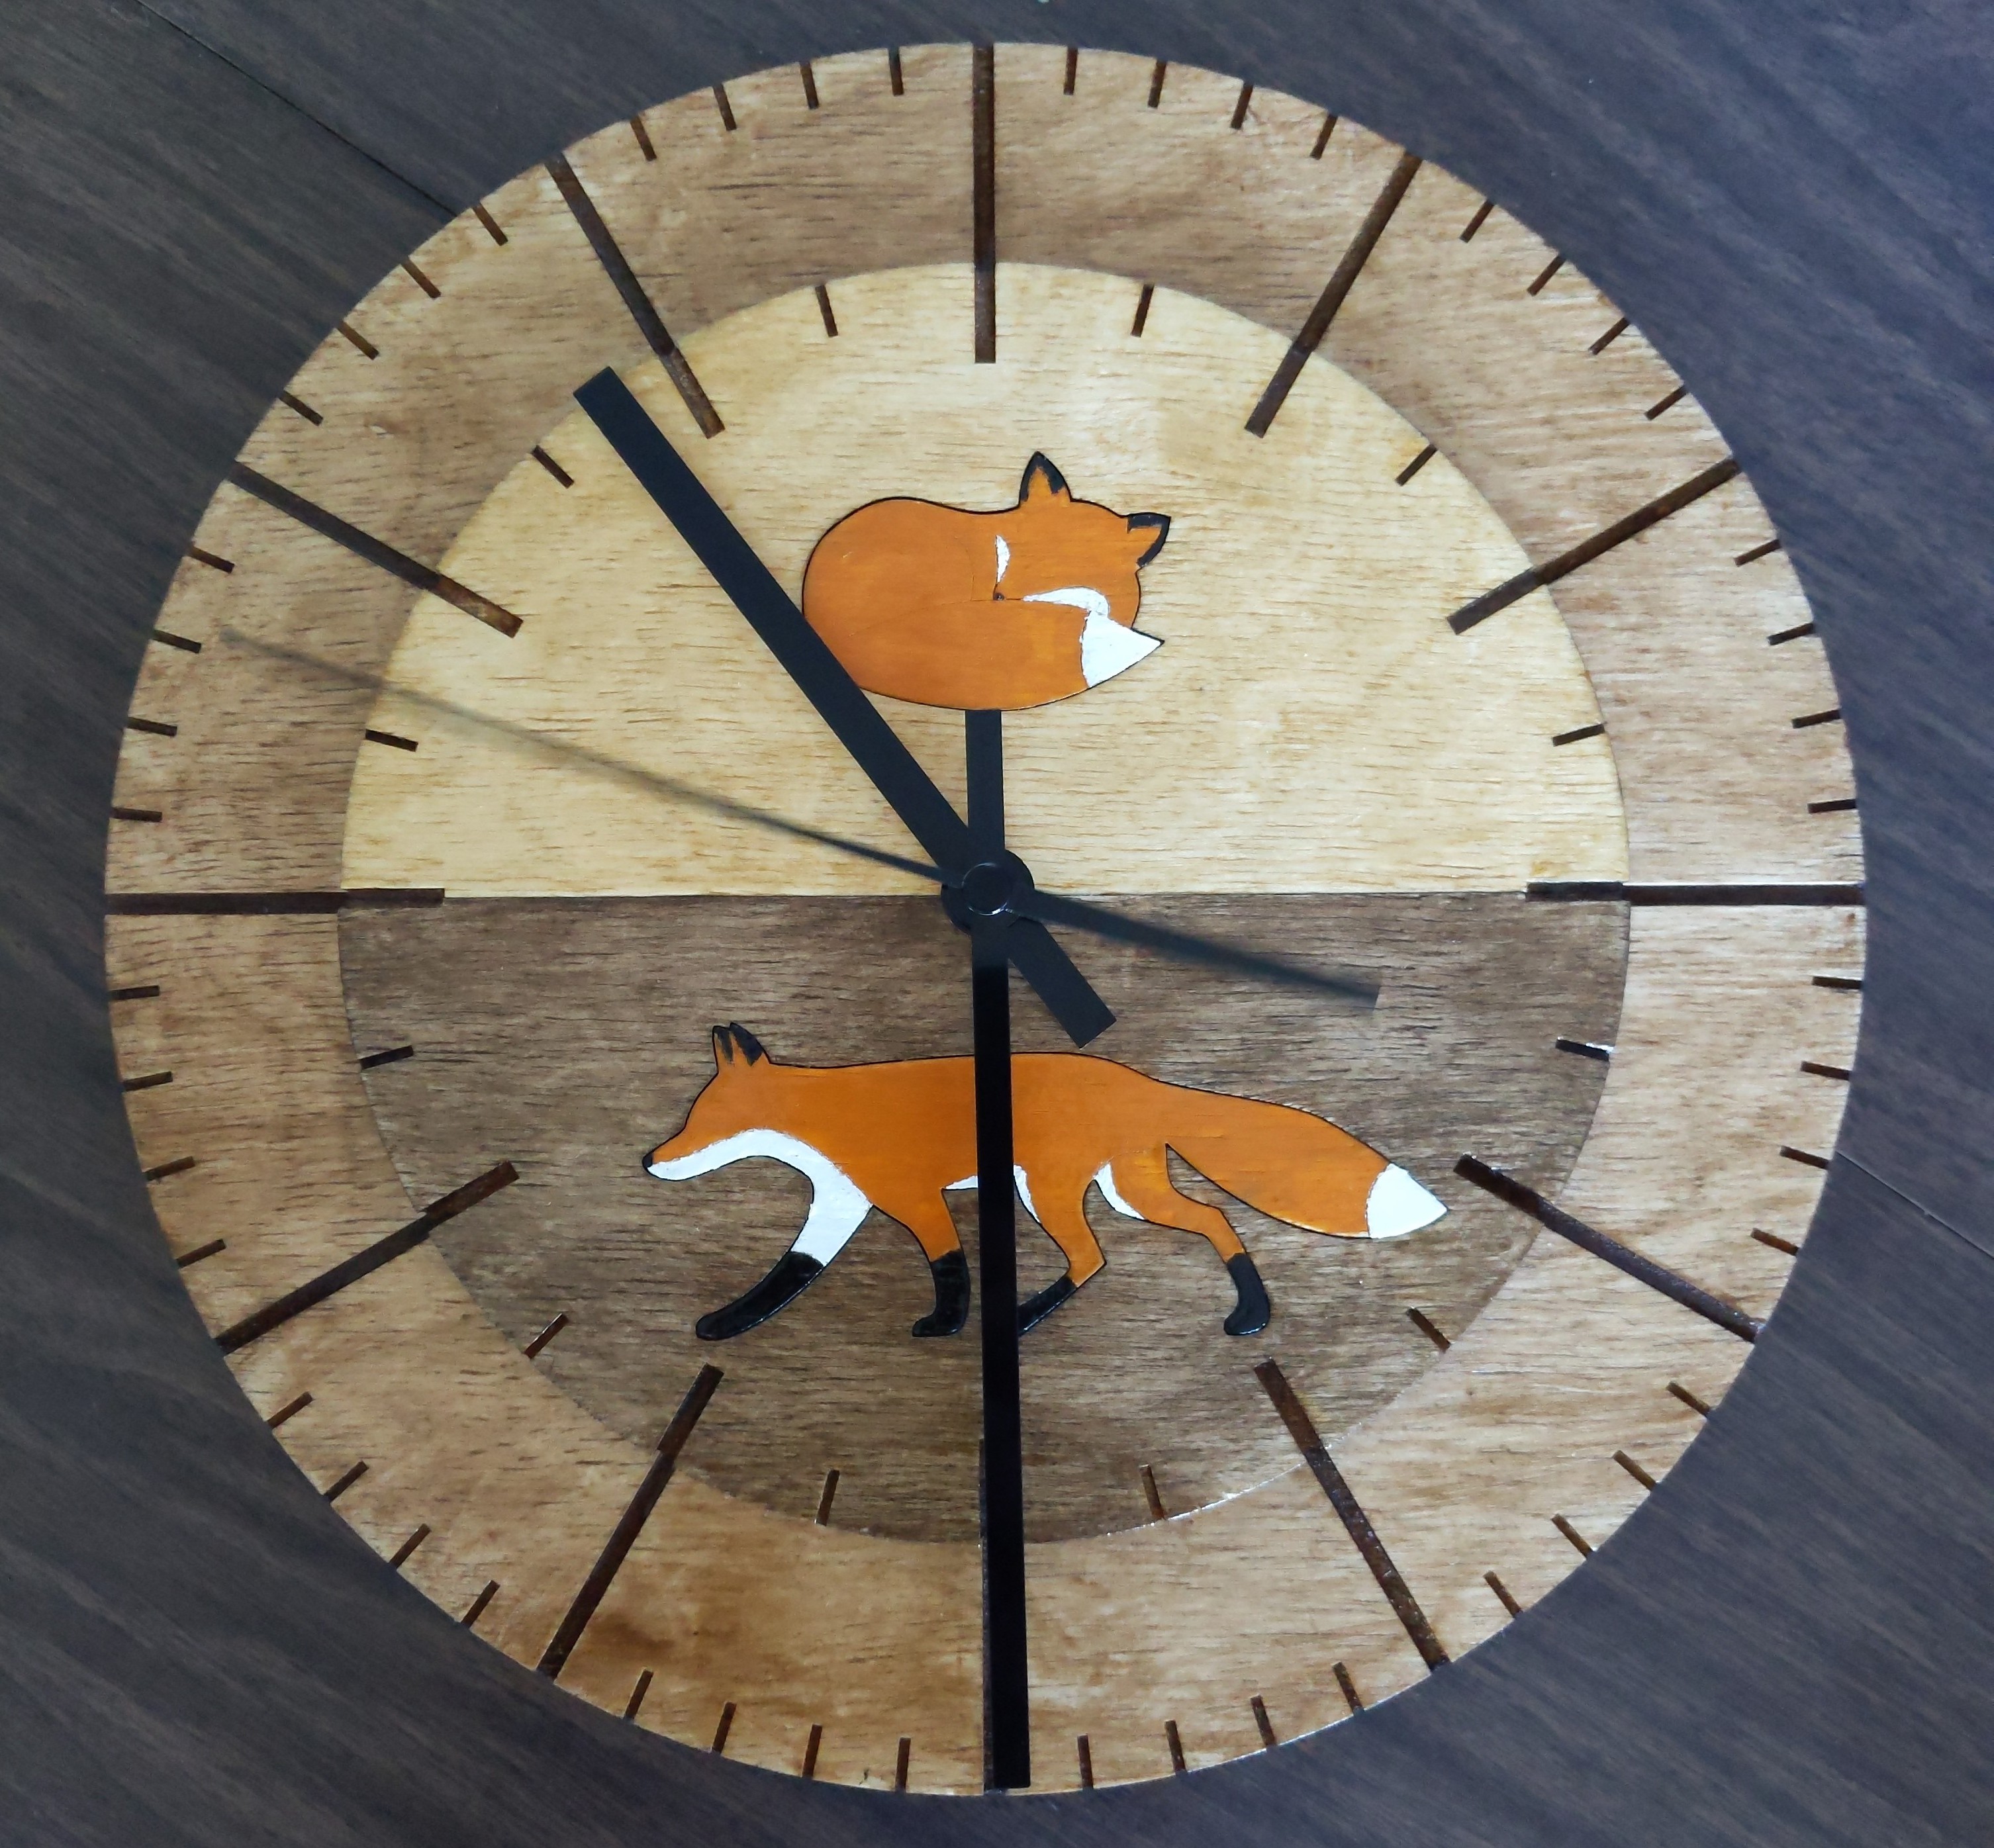
Sleeping and waking foxes represented day and night this time. Because foxes are nocturnal, the sleeping fox represented day. (My friend is also nocturnal, so it worked in that way, too.)
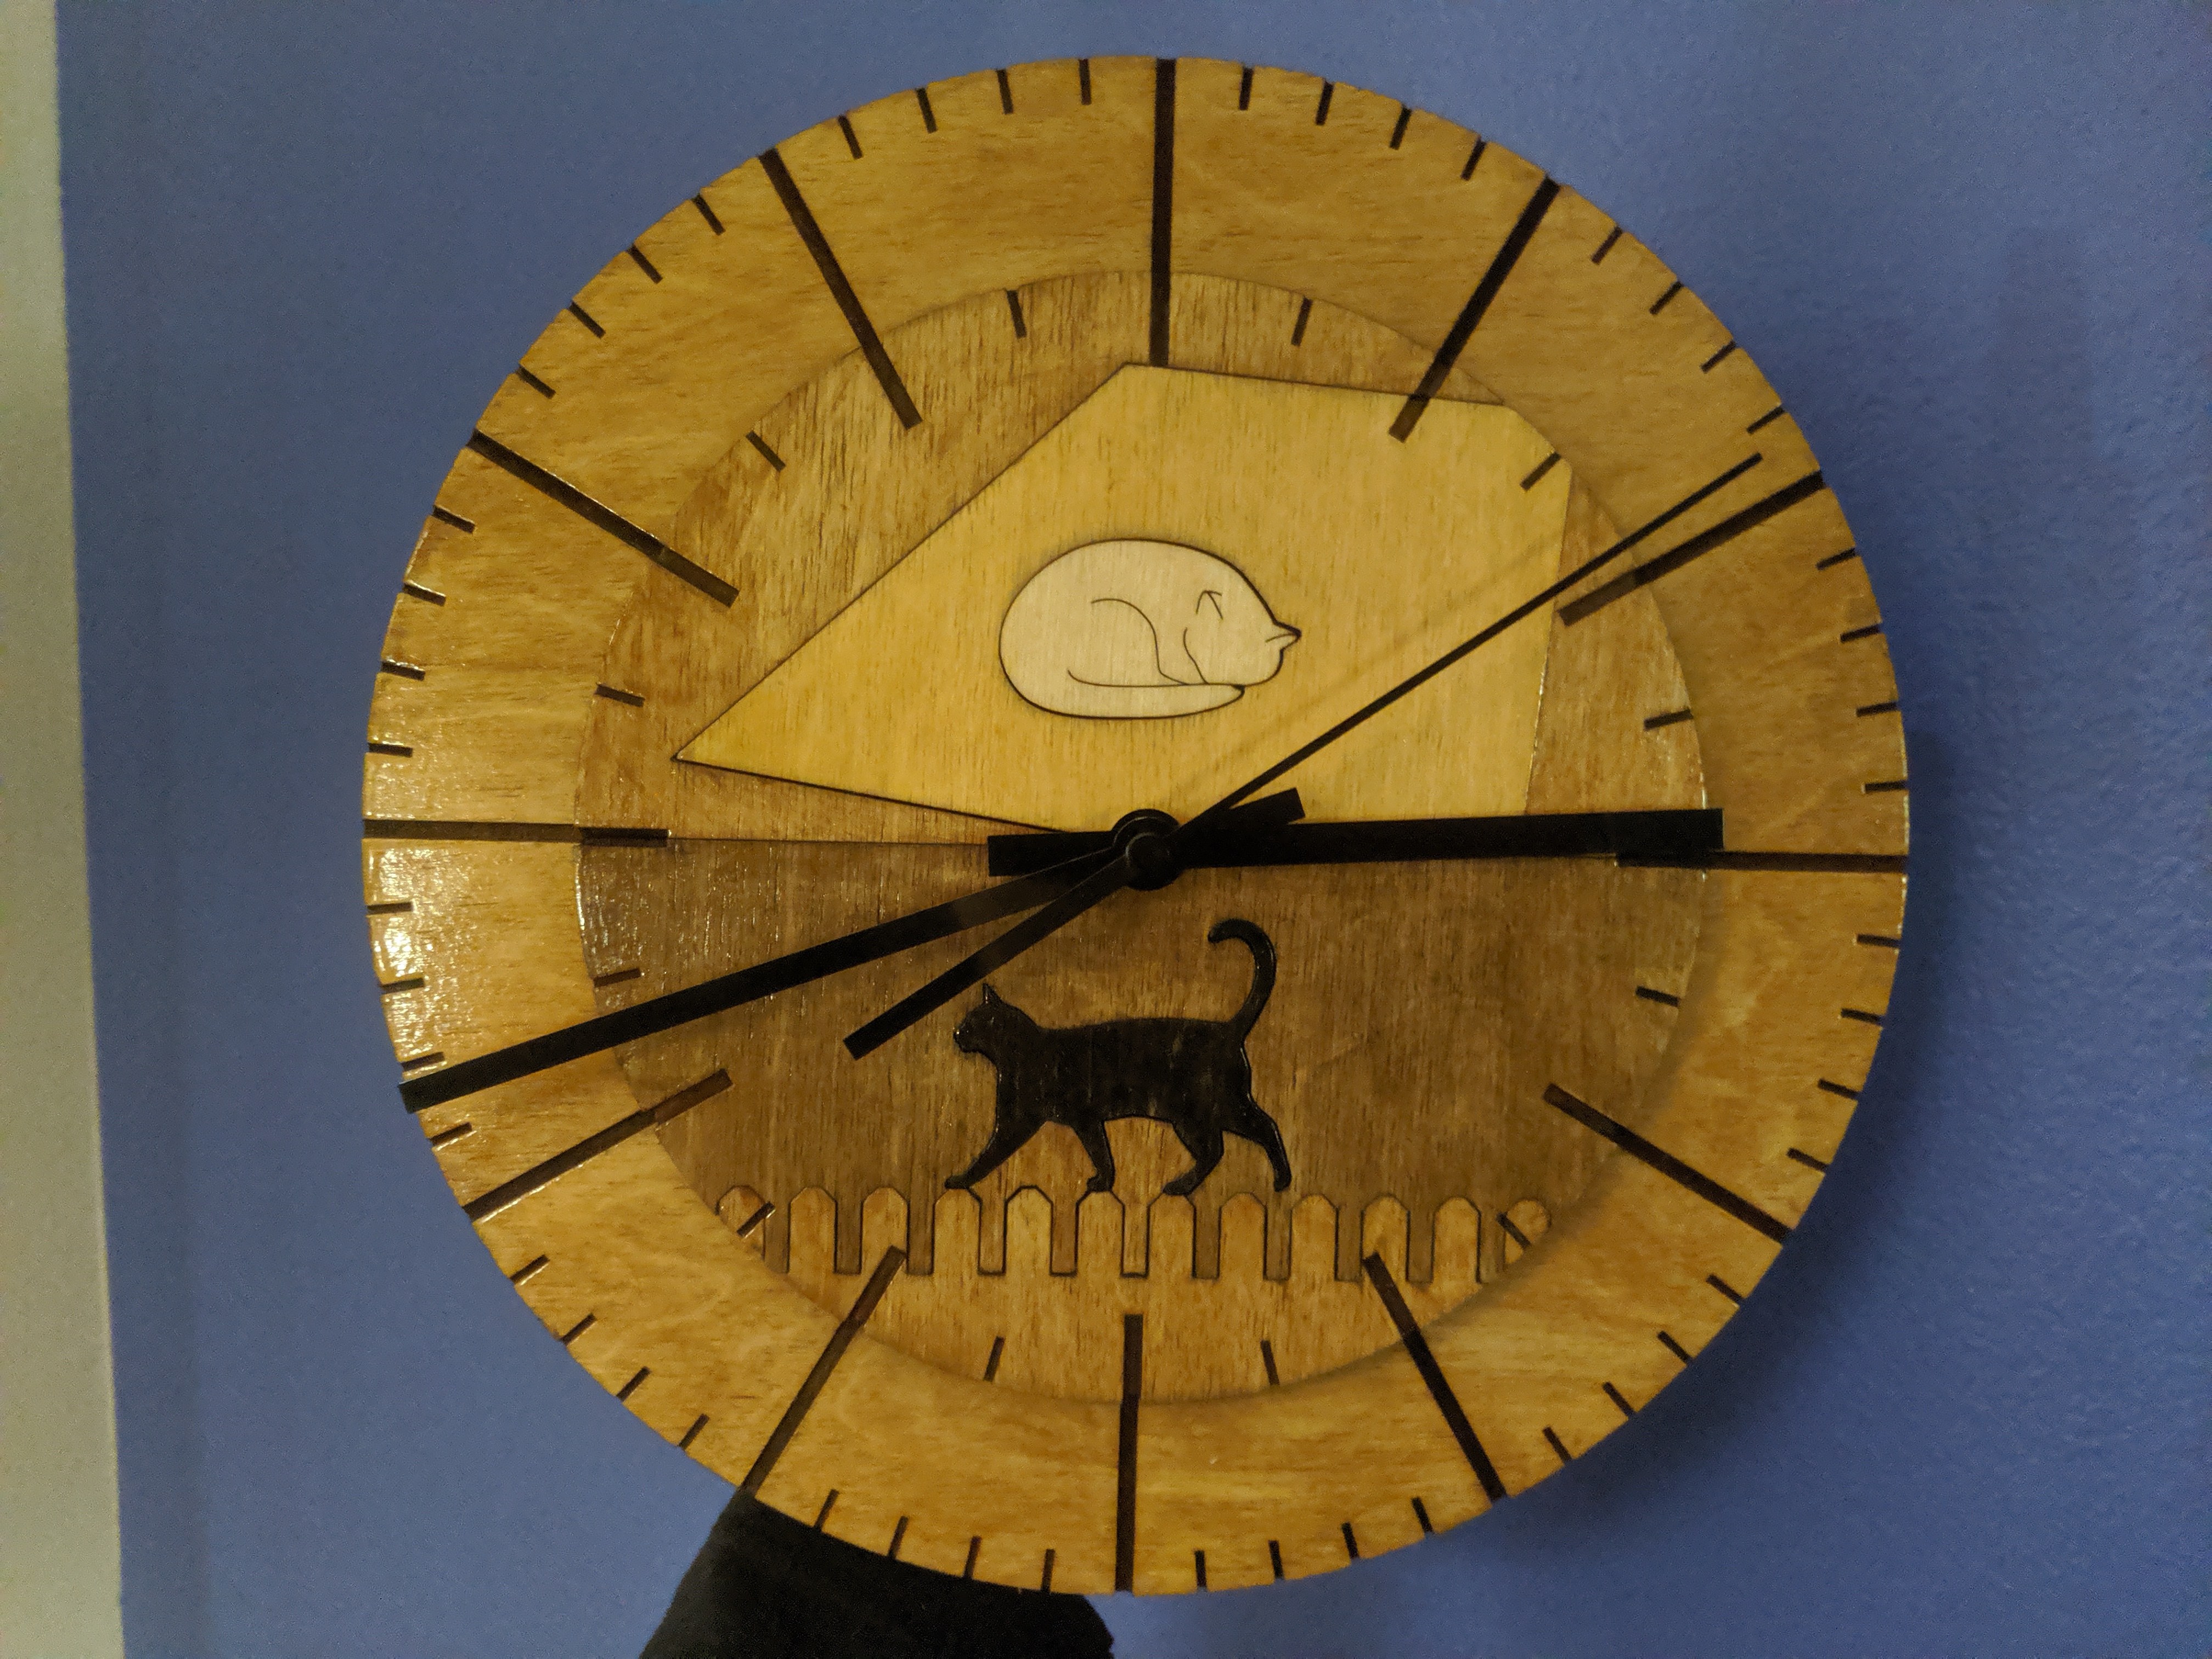
cat clocks
My latest clock project was to make a clock for my father’s birthday. He loves cats, so the motif was not hard to choose. I wasn’t sure of whether he would appreciate the nocturnal placement of the cats, so I tried to run by him the idea of using cats as emblems signifying day and night without spoiling the surprise of what I was making. It’s a good thing that I failed to conceal my motive, because he offered a great design suggestion: adding background elements to the image.
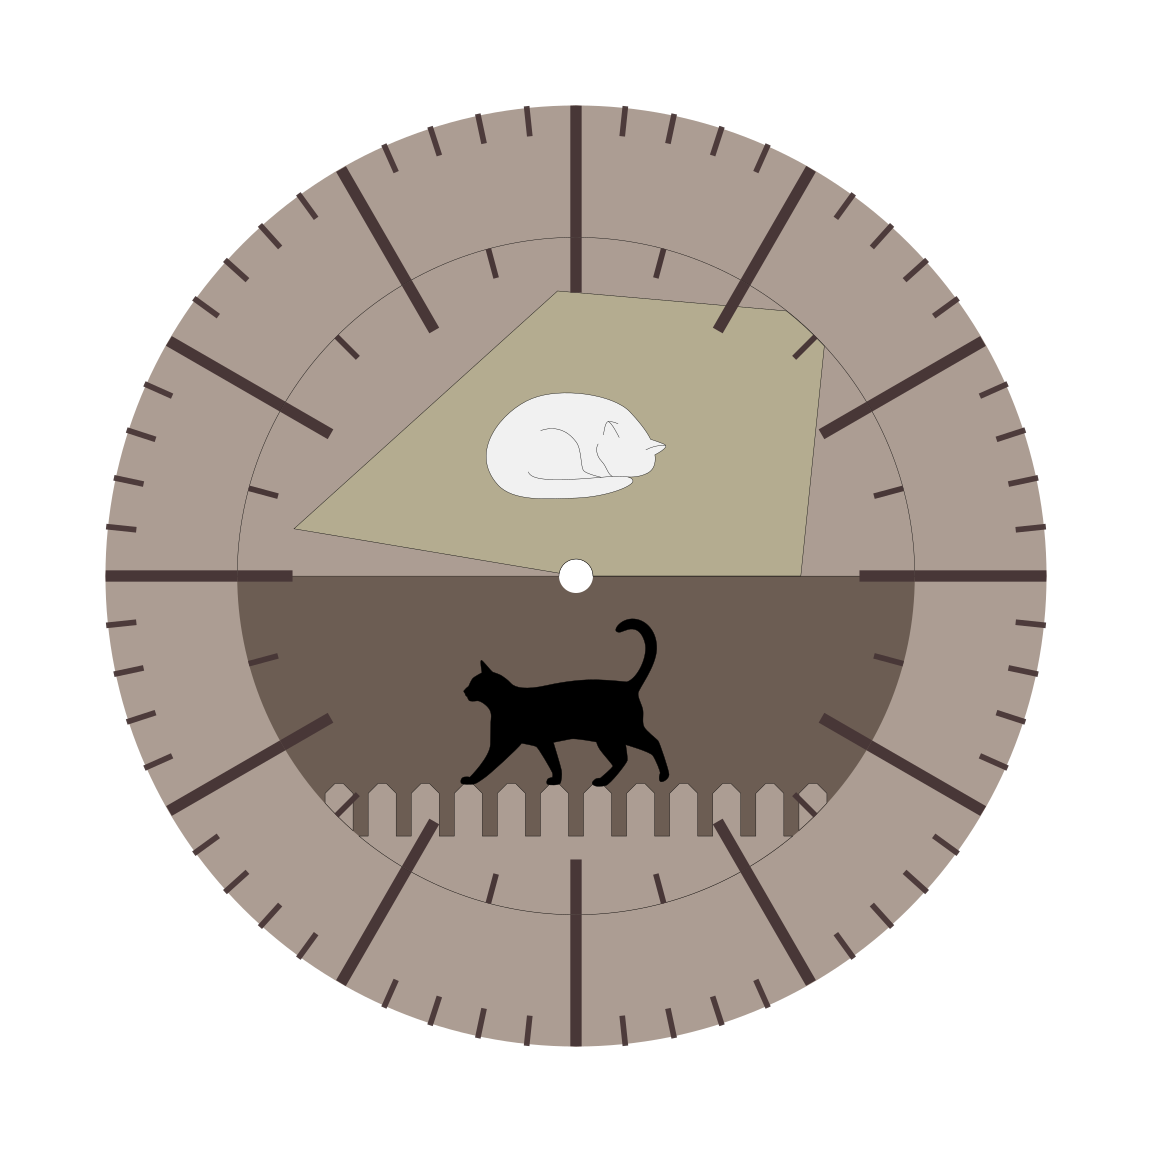
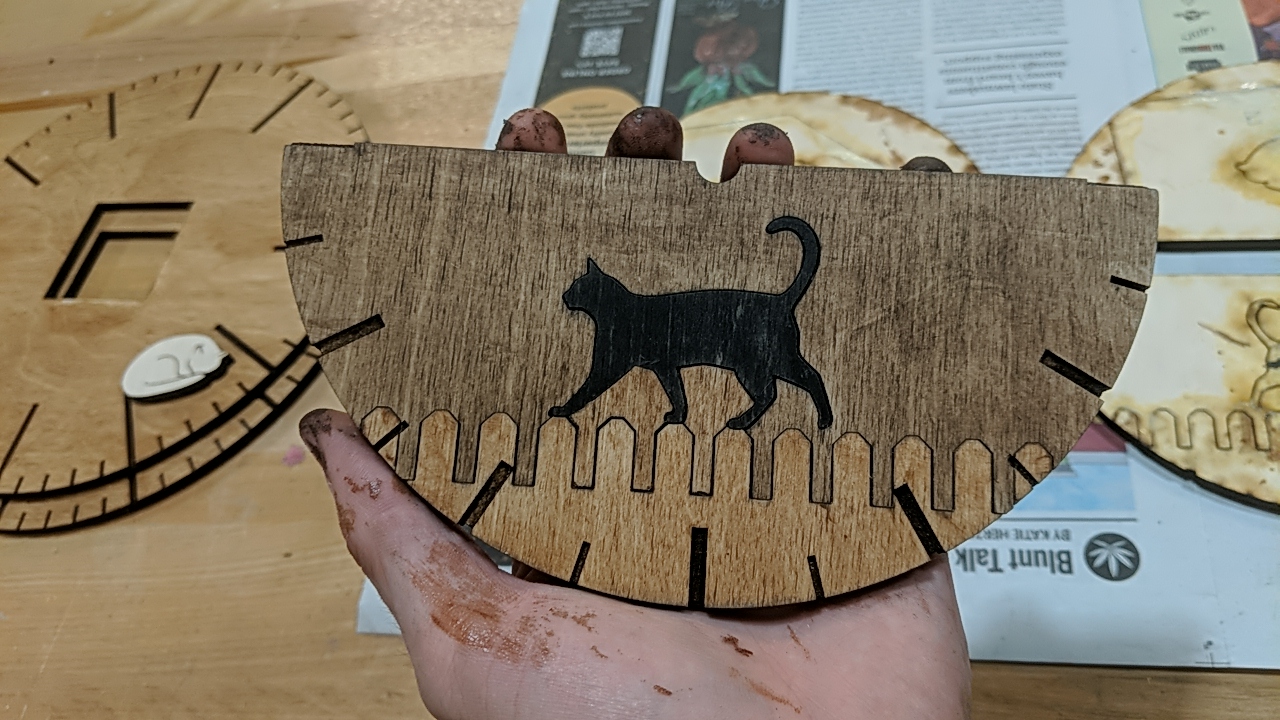
The sleeping cat is curled up in the sunlight coming in through a window, and the waking cat is slinking along the top of a picket fence in the dark.
the fabrication process
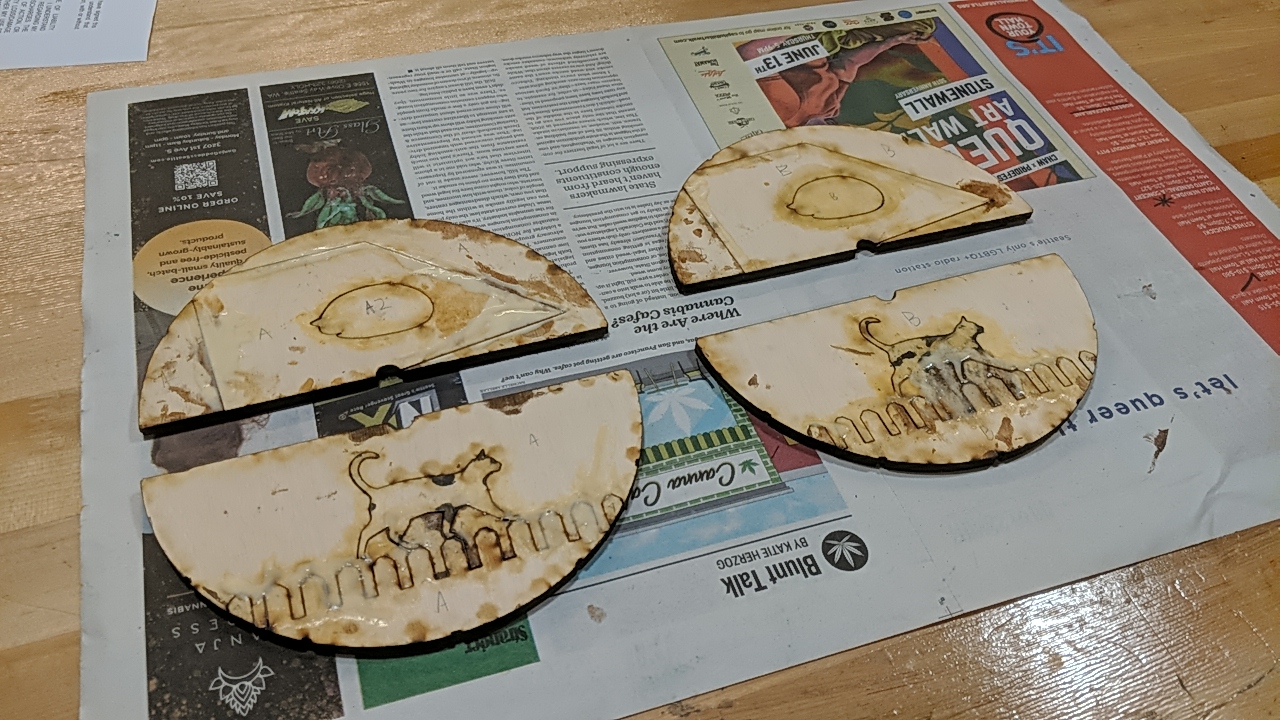
Now I’ll show you how I made these. The fabrication of the cat clock was similar to that of the other three, so I’ll just show you that one. I made two cat clocks, so you’ll see duplicated parts in these photos.
My workplace has a workshop with an Epilog Mini 24 laser cutter with a 40W tube. I made these SVG files and loaded them into Visicut (open-source software that drives the laser cutter).
the minute disc
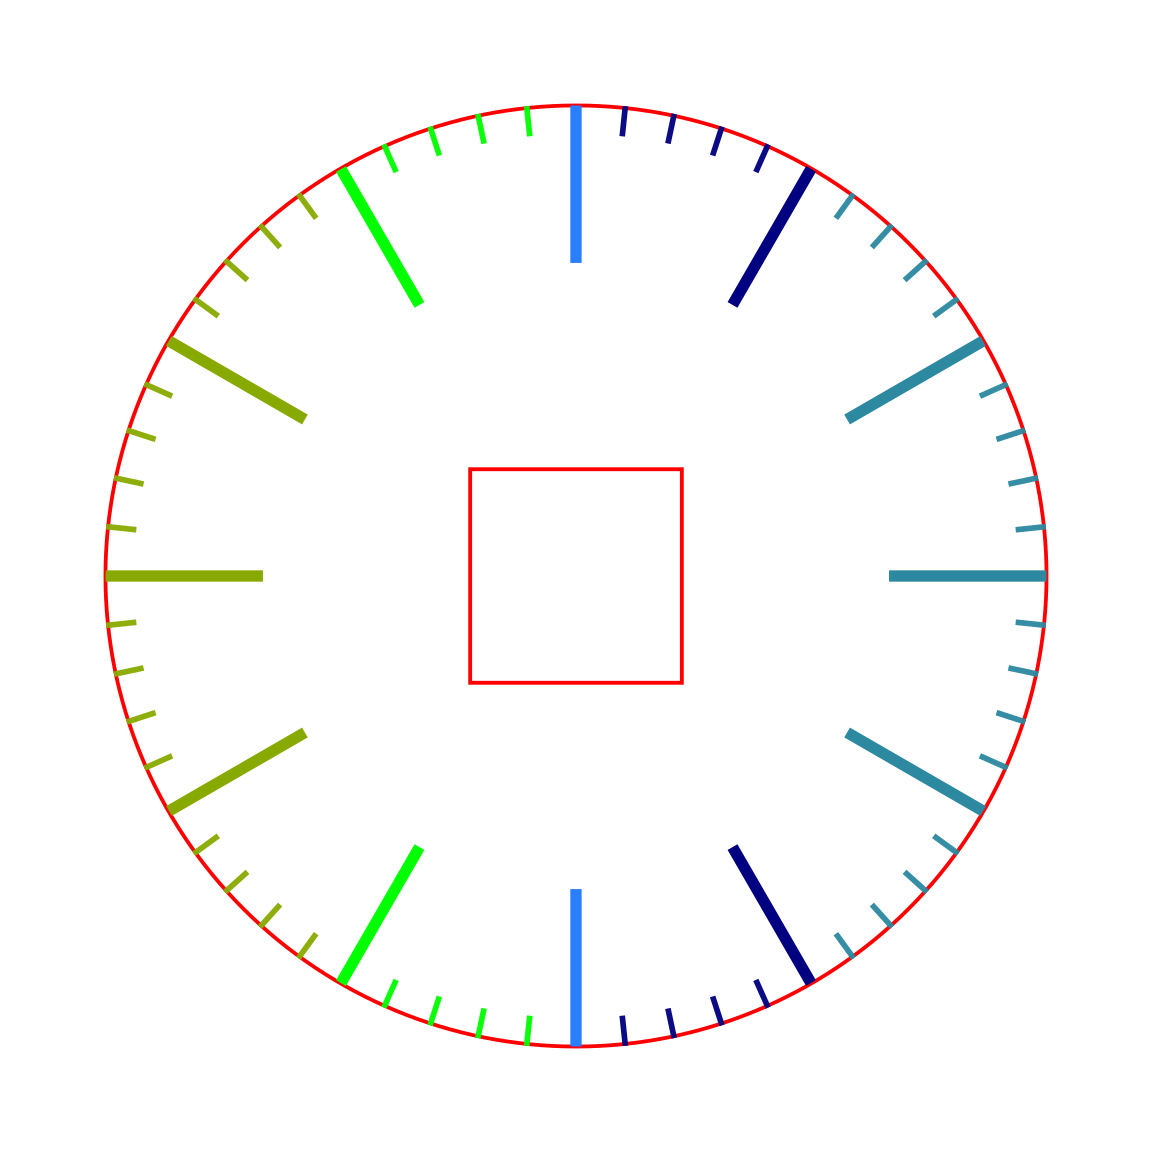
The minute disc’s cutting instructions are:
- engrave the notches
- cut a square hole in the middle
- cut a circle around the outside
You’ll notice that the notches form five groups of different colours. The different colours partition the notches so that they can be grouped easily into jobs in Visicut. Within each engraving job, the laser cutter’s head moves from side to side to cover the whole width of each row before moving down to the next row. If an engraving job includes shapes covering a great width, the head will spend a long time moving from side to side, but in this case there’s nothing to engrave over much of that width. I chose these partitions to minimise the horizontal overlap, within each job, of notches that are far apart, thereby reducing the engraving time by several minutes. All of those moves really add up!
It’s important to cover the surface with masking tape, because the smoke from the burnt wood forms a streaky brown stain around each cut. It’s also important to do a dry run of the outline cut to ensure that all of the cuts will really be within the area that you’ve taped.
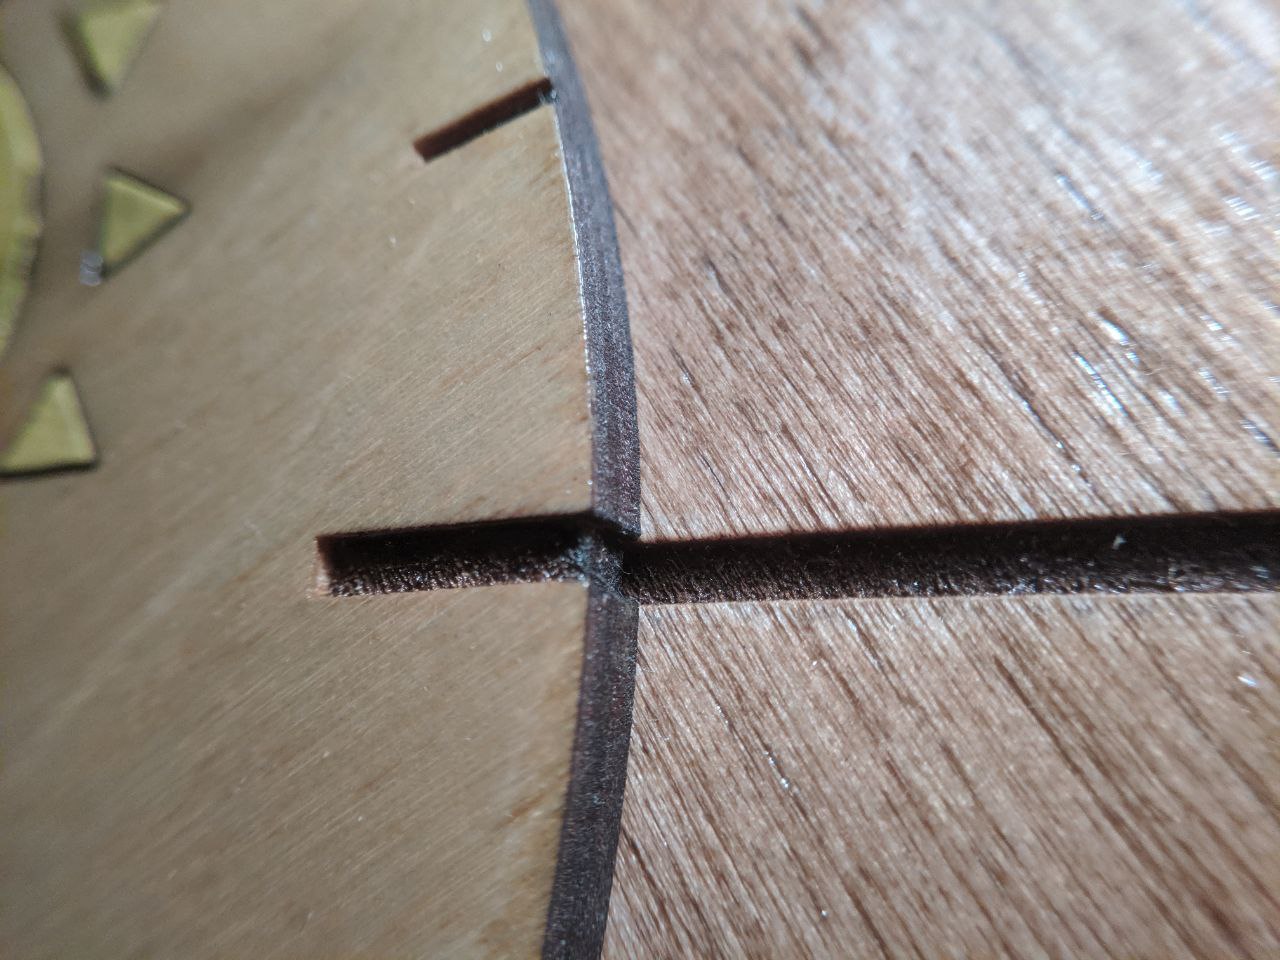
The piece isn’t always perfect coming out of the laser cutter. My minute disc had some burn marks and some splinters, so I sanded it and fixed one of the splinters on the edge with a file and a marker.
the hour disc
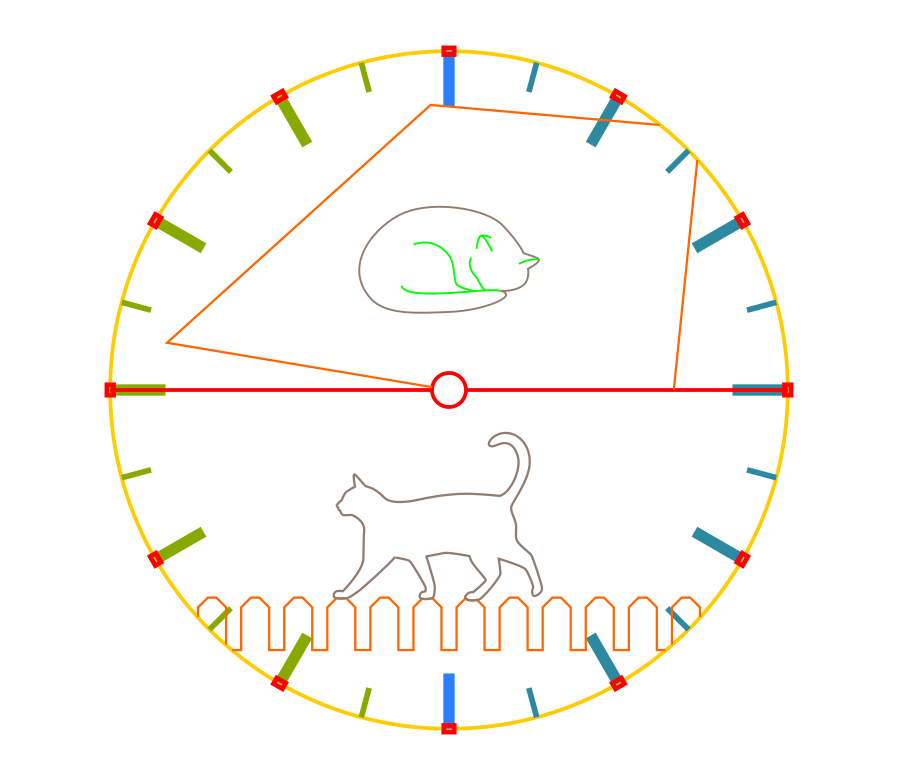
The hour disc’s cutting instructions are:
- engrave the notches
- mark the interior lines in the sleeping cat
- cut out the cats
- cut out the background details (the fence and the light from the window)
- cut the disc in half with a circular hole in the middle and cut notches in the edge
- cut the edge of the disc
The order in which these steps are executed is important! If small pieces are cut out before other operations are done on them (say, if we cut out the fence before engraving the notches), then the pieces may shift, misaligning them for subsequent operations.

a note about the materials and settings
By the way, in case you’re following along with the same laser cutter, my settings are:
| mode | power | speed |
|---|---|---|
| cut | 100 | 5 |
| mark | 40 | 15 |
| engrave | 100 | 10 |
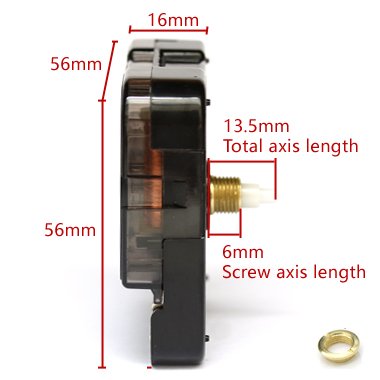
But you should experiment with settings on scrap pieces of your wood. These settings are for the 6 mm plywood I got at Blick art supply store. 6 mm is the ideal thickness because that’s the length of the bolt on the movement I bought.
assembly
I glued all of the graphical pieces together to make the two halves of the hour disc.

Then I waited three weeks for the movement to arrive on the slow boat from China.
The bolt on the movement is just long enough to pass through one disc, not two, so the body of the movement rests against the back of the hour disc and the minute disc has a big square hole to accommodate it. Actually, when I received the movement in the mail, I was surprised to discover a design change: there is now an extra ring of plastic at the base of the bolt which shortens the bolt by about a millimetre.
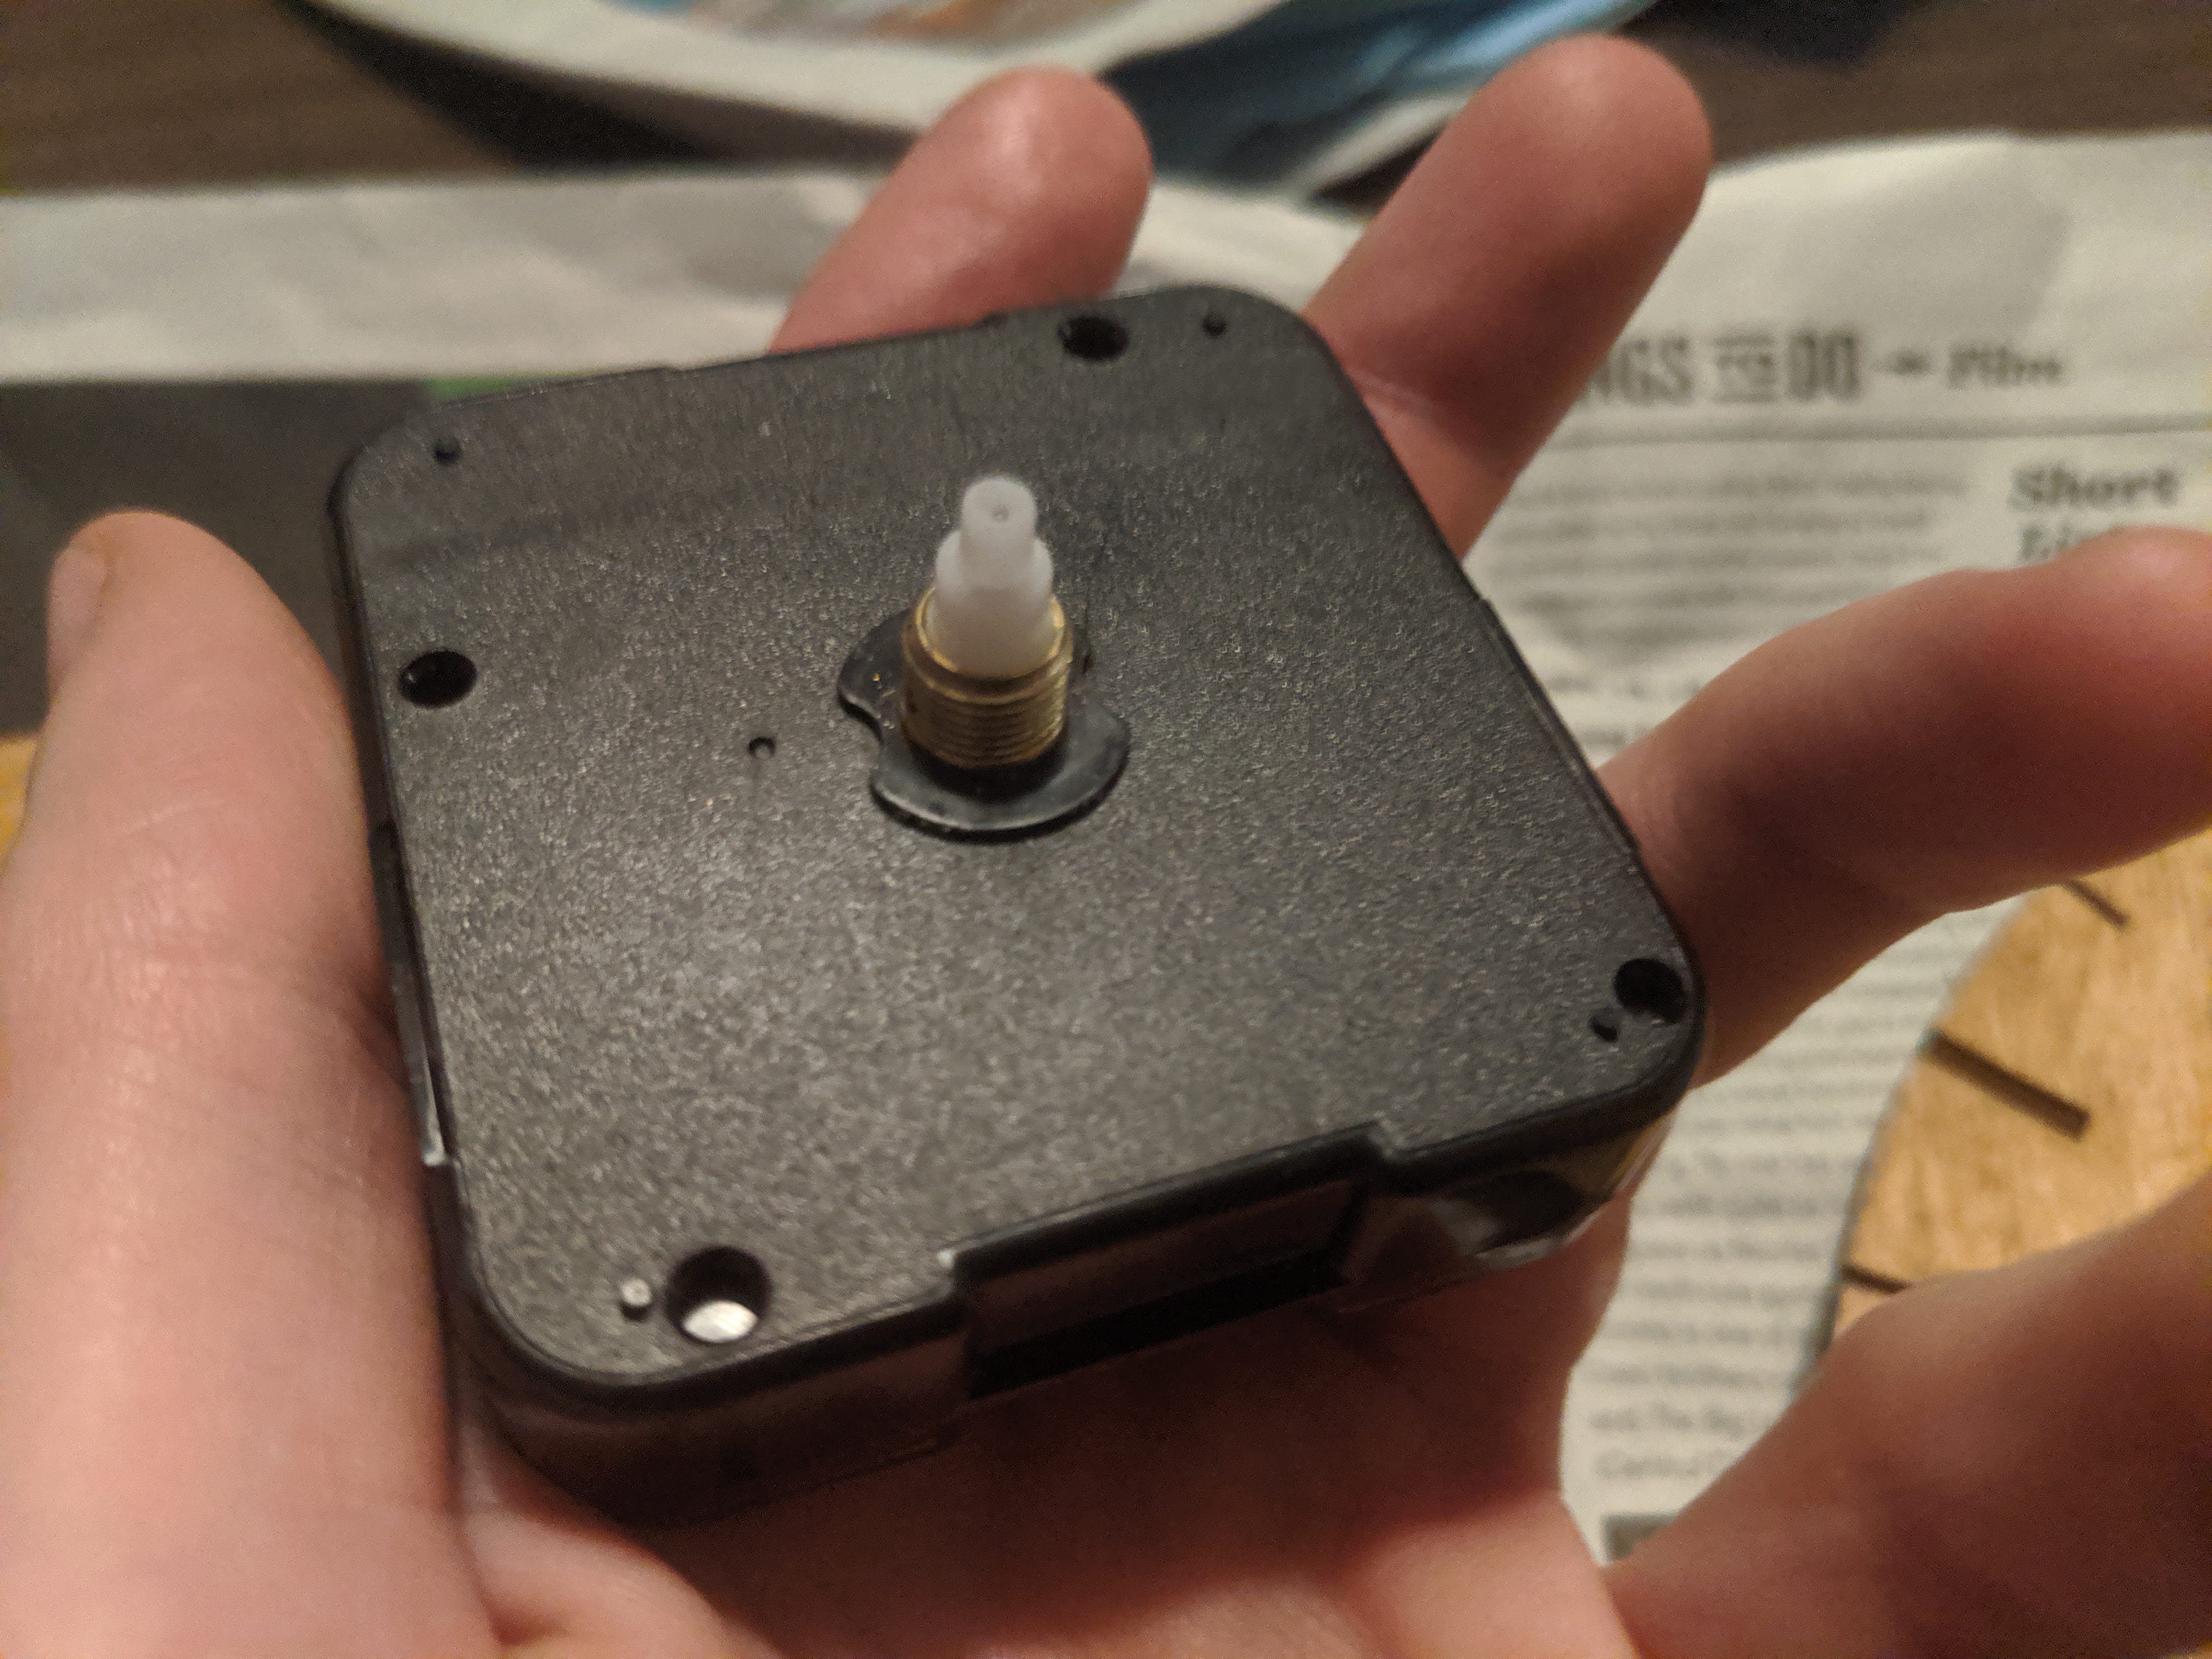
I had to file down the wood to fit the plastic ring.
The bolt is held in place by a nut on the front of the face. The nut has a flange that fits snugly into the hole on the hour disc, so I used the movement and the nut as an alignment guide for gluing the two halves together.
I soon got kicked out of the workshop for routine maintenance, so I fashioned these makeshift gluing clamps at home.
The last steps were to apply a couple of coats of shellac,
a hook for hanging on the wall,
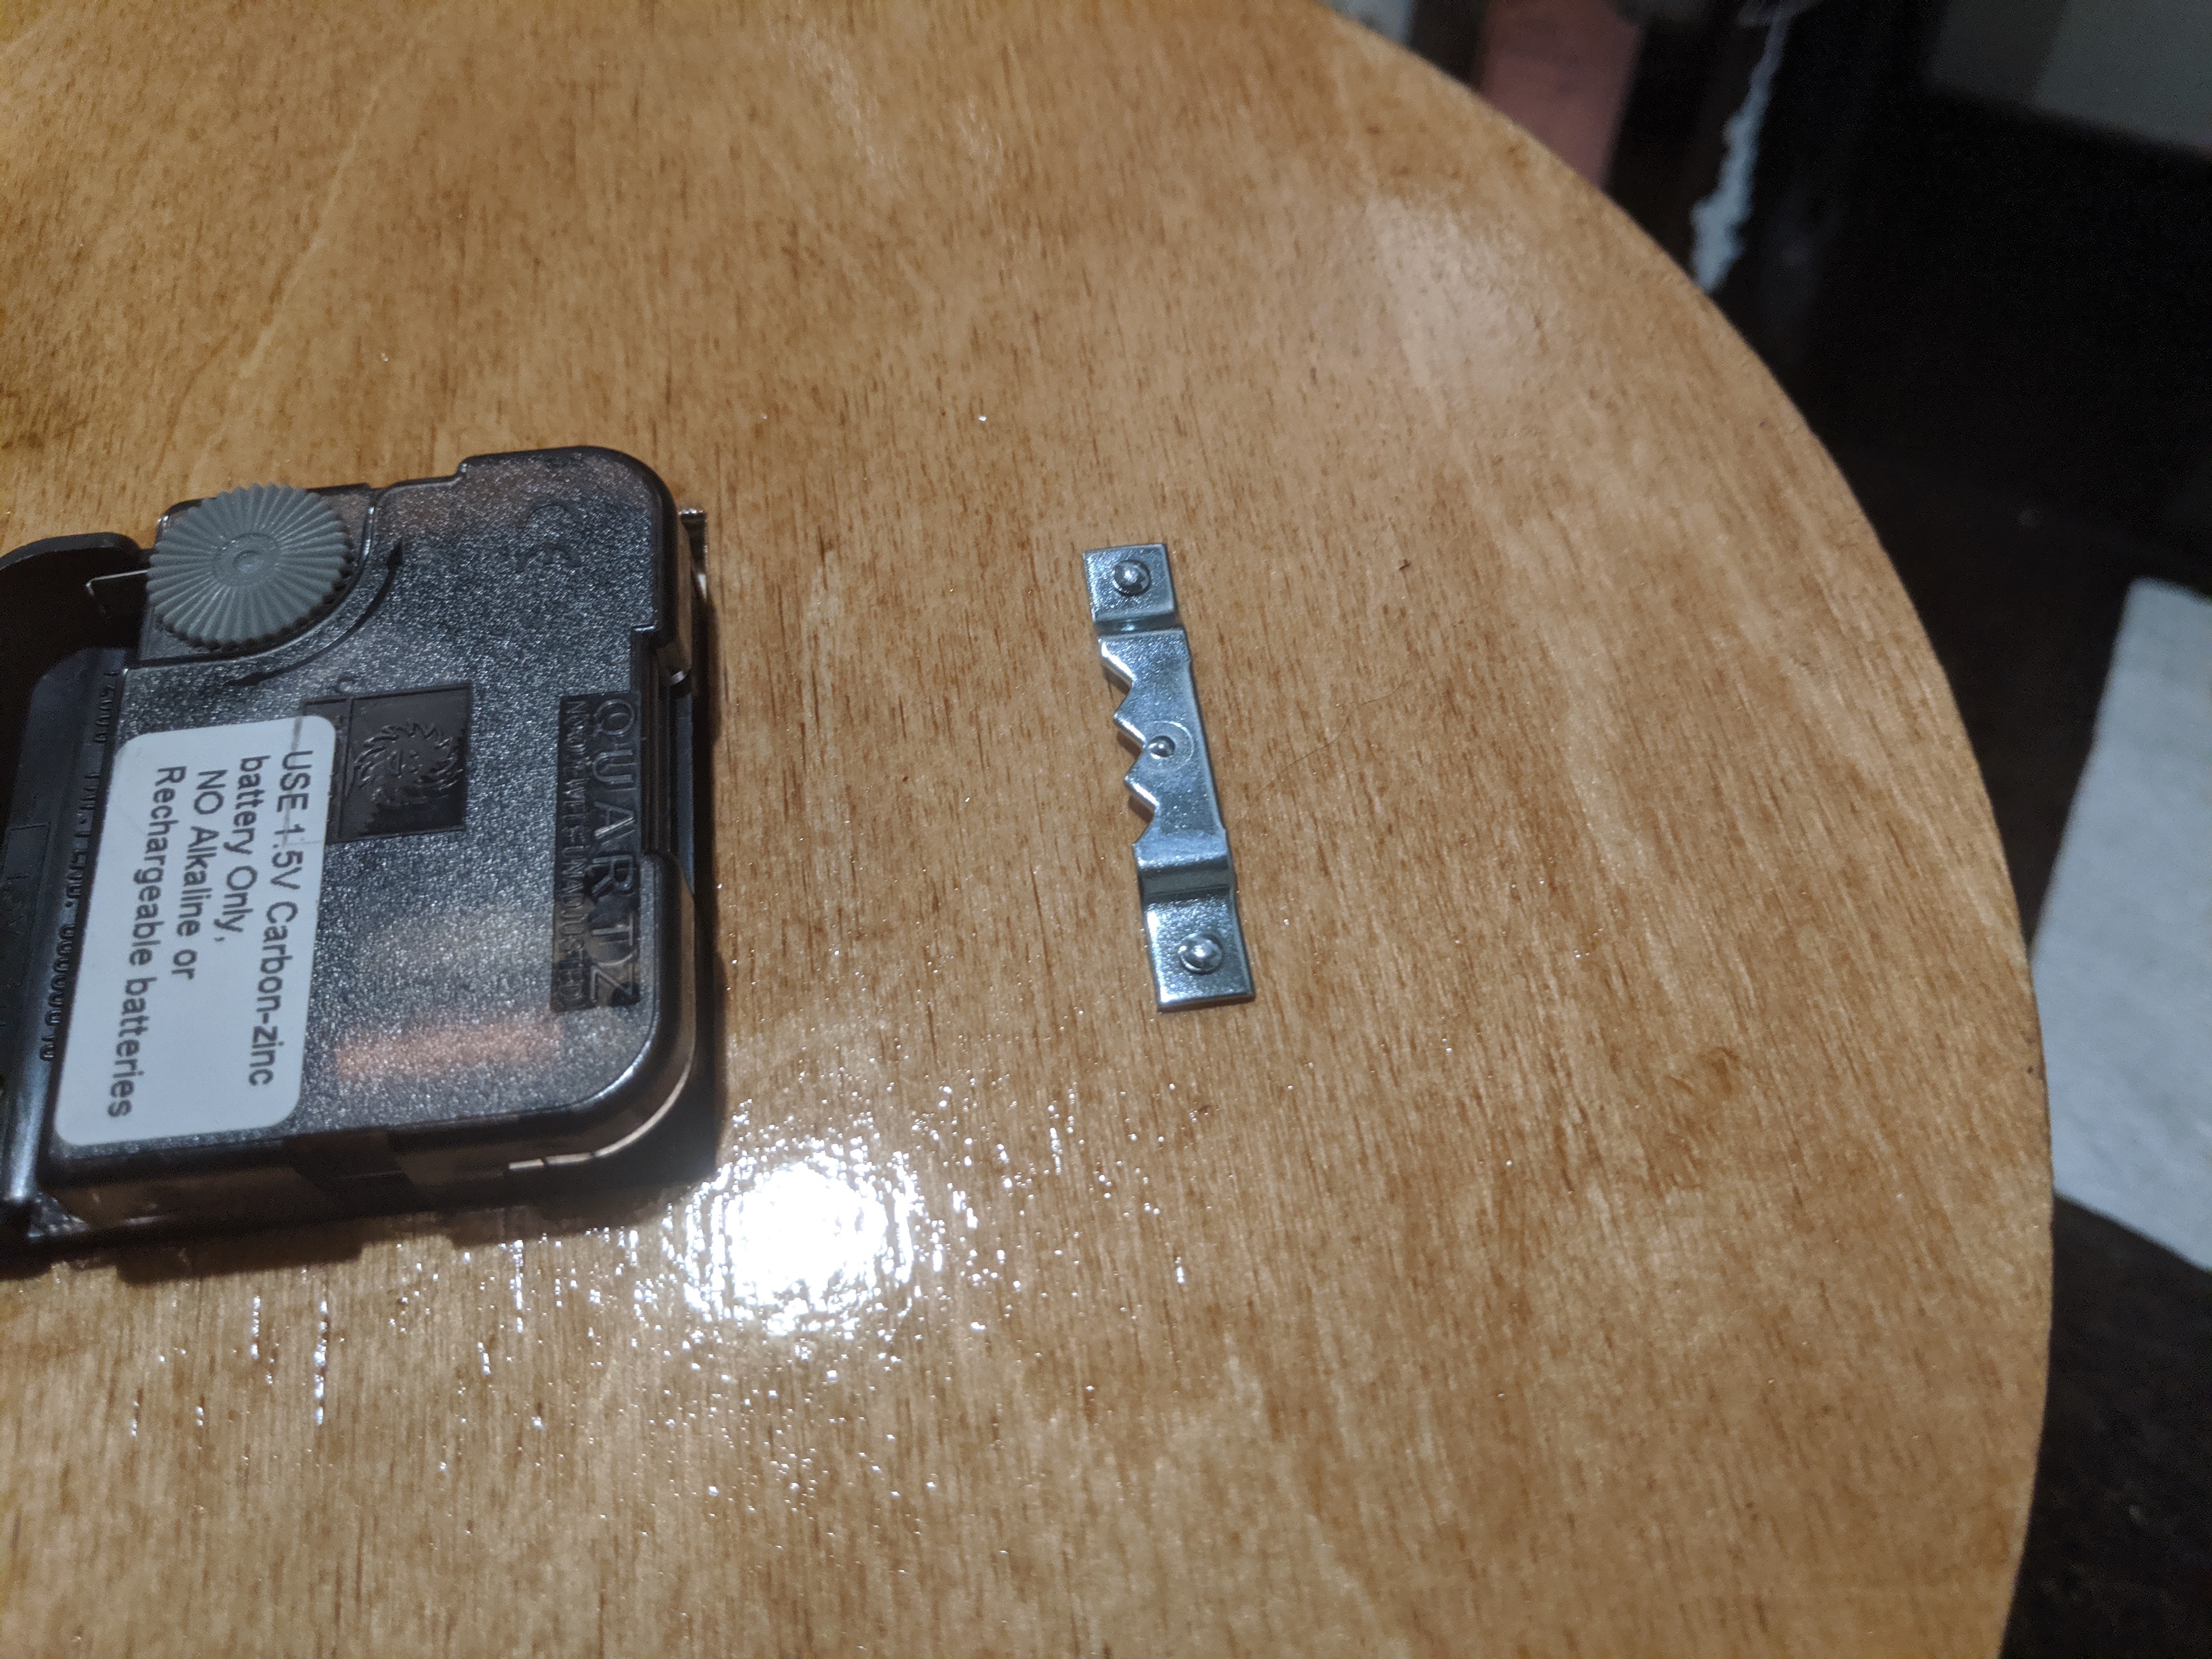
the movement, and the hands.
Done!